

Welcome to Your Go-To Resource for Cleaning Smok Vape Pods!
Discover the ultimate solutions for maintaining your Smok Vape Pods with our comprehensive guides and tips. Whether you're a new user or a seasoned vaper, ensuring your pods stay fresh and perform at their best is crucial. Dive into our articles like "A Step-by-Step Guide to Easily Clean Your Smok Vape Pods" and follow "The Ultimate Cleaning Routine for Your Smok Vape Pods" to enhance your vaping experience.
Say goodbye to residue and hello to pristine pods with "Simple Steps to Clean Your Smok Pods." We offer "Quick and Easy Methods for Cleaning Smok Vape Pods" and "The Best Practices for Cleaning Your Smok Vape Pods Without Hassle" so you can enjoy optimal flavor every time.
Explore "How to Maintain Your Smok Vape Pods: Easy Cleaning Tips" and "Smok Vape Pods Care: Essential Cleaning Steps for Optimal Flavor" to ensure your pods last longer. Our "DIY Cleaning Hacks for Your Smok Vape Pods: A User’s Guide" provides innovative solutions to keep your devices in top condition.
Prioritize the longevity of your Smok Vape Pods with "Ensure Longevity of Your Smok Vape Pods: Easy Cleaning Techniques You Need to Know." Keep your vaping sessions fresh and delightful with our expert cleaning guidance.

The Ultimate Cleaning Routine for Your Smok Vape Pods
Maintaining your Smok vape pods is crucial not just for enhancing your vaping experience but also for ensuring your device stays in good working condition. Over time, residue from vape juice can build up, impacting flavor and performance. Here’s a step-by-step cleaning routine to help you keep your vape pods fresh and functional.
Disassemble Your Device
Before diving into cleaning, it’s essential to disassemble your vape pod properly. This ensures that all parts are accessible and can be cleaned effectively without damaging any components.
- Remove the Pod: Gently pull the pod from the device. Most Smok mods make it easy to do this, but be sure to grasp the pod firmly without using excessive force.
- Take Out the Coil: If your pod has a replaceable coil, remove it as well. This is an important step because coils often absorb e-liquid and can result in built-up residue, which can affect flavor.
- Separate the Components: Depending on your specific model, there might be additional parts to consider. Typically, you will encounter:
- Mouthpiece
- Pod chamber
- Base (if applicable)
Personal anecdotes from experienced vapers often emphasize the importance of being gentle during this process to avoid breaking any components. Remember: patience is key!
Rinse with Warm Water
Once you've disassembled your device, the next step involves rinsing all non-electronic parts with warm water. This helps remove most of the leftover vape juice and discoloration.
- Use Warm (Not Hot) Water: Hot water can damage certain materials, so stick with warm water.
- Rinse Thoroughly: Hold each component under warm running water.
- Make sure to allow the water to flow through the mouthpiece and the coil (if reusable) to dislodge any sticky residue.
- Avoid Soaking: Just a quick rinse is sufficient at this stage. Avoid soaking the electronic components, as moisture can compromise the circuitry.
Vapers frequently report that rinsing with warm water is often underestimated in its ability to clear out a significant amount of residue. It’s a simple yet effective step!
Soak in Cleaning Solution
To tackle tougher residues or to thoroughly sanitize your components, soaking them in a cleaning solution can work wonders. There are various cleaning solutions available, but you can also use household items.
- Choose Your Cleaning Solution:
- You can opt for a commercial vape cleaner or use natural options like vinegar or baking soda.
- Make sure whatever you choose is appropriate for vaping devices.
- Prepare Your Soaking Solution:
- If using vinegar, mix it with equal parts water. For baking soda, dissolve a tablespoon in a bowl of warm water.
- Soak for a Few Minutes:
- Submerge the pod and mouthpiece in the solution and let them soak for about 10-15 minutes. This helps dissolve any stubborn build-up.
- Coil Treatment:
- If you're cleaning the coil, ensure it’s compatible with soaking, as some coils may degrade in water. If it's a reusable coil, you might want to follow specific manufacturer instructions.
Soaking not only cleans but can also reduce the chances of residue building up over time. Vapers often experience a newfound level of freshness after using soaking techniques!
Scrub Gently
Now that you’ve let your components soak, it's time to scrub them gently to ensure all residue is removed.
- Use a Soft Brush:
- A toothbrush or a small cleaning brush works best. Avoid metal brushes, as they can scratch your vape components.
- Pay Attention to Crevices:
- Focus on areas where residue is often trapped, such as the corners of the pod and inside the airflow holes.
- Be Gentle:
- Apply minimal pressure during scrubbing. Forcing hard can damage delicate components.
Many seasoned vapers have shared tips about how meticulous cleaning is important, especially for those who frequently change flavors. By gently scrubbing, you create a cleaner environment for your next vape experience.
Rinse and Dry
After scrubbing, the next step is to rinse off the cleaning solution quickly.
- Rinse Thoroughly:
- Use warm water again and make sure to wash away any residual cleaning solution, as this can affect your next vaping session.
- Dry with a Soft Cloth:
- Use a microfiber cloth to pat dry your components. Avoiding paper towels is advised because they can leave behind lint or scratch surfaces.
- Air Dry:
- Leave the parts out for a few minutes to fully air dry. This is particularly important for the coil; ensuring it’s completely dry can improve its longevity and performance.
Vapers often highlight the satisfaction that comes from seeing their pod components looking brand new. This final rinse and drying stage is what makes all the hard work worth it!
Reassemble and Test
Finally, it’s time to put your device back together and ensure everything is working properly.
- Reassemble Components:
- Start by placing the dry coil back into the pod, followed by the pod itself into the device.
- Check Connections:
- Ensure that everything clicks back into place firmly. Loose connections can lead to suboptimal performance.
- Test with E-Liquid:
- Before taking a long puff, fill your pod with a fresh e-liquid and let it sit for a few minutes. This allows the coil to saturate properly without burning out.
- Take a Test Draw:
- Start with a few small, gentle puffs to check for flavor and the vaping experience.
It's always a rewarding moment for vapers when they get to experience the taste of fresh e-liquid with a freshly cleaned pod. This moment makes all the cleaning worth it!
Conclusion
In summary, maintaining your Smok vape pods through a structured cleaning routine can greatly extend the life of your device and improve your vaping experience. From disassembling your device to the final test draw, following these steps will help you eliminate stubborn residues and enjoy optimal flavor during every session. By following this guide, you'll not only enhance the performance of your device but also save on replacement parts in the long run. Happy vaping!
DIY Cleaning Hacks for Your Smok Vape Pods: A User’s Guide
Having established an ultimate cleaning routine for your Smok vape pods, it's time to explore some DIY cleaning hacks that can help you tackle tough residues and maintain your device effortlessly. These techniques ensure that you’re not just cleaning, but also extending the lifespan of your pods efficiently. With a little ingenuity and some common household items, you can achieve a spotless clean. Let's dive into the effective DIY cleaning hacks!
Use Vinegar for Tough Residues
Vinegar is an incredible natural cleaner, known for its versatility and effectiveness, especially when it comes to breaking down stubborn residues in vape pods. When it comes to how to clean reusable vape pods, vinegar is often a game-changer.
- Why Choose Vinegar?:
- Vinegar possesses natural acidic properties that can dissolve mineral deposits and clingy residue left behind from e-liquids.
- It's non-toxic, eco-friendly, and a budget-friendly option for cleaning.
- How to Use It:
- Prepare the Solution: Mix equal parts of white vinegar and warm water in a bowl.
- Soak: Place your disassembled pod components (mouthpiece, pod chamber, etc.) into the mixture and let them soak for approximately 10-15 minutes. This allows the vinegar to penetrate and loosen the tough residues.
- Scrub: After soaking, grab a soft brush or even a toothbrush to scrub any remaining stubborn spots. The combination of the vinegar and gentle scrubbing should cut through most residues easily.
- Rinse Thoroughly:
- Once you're satisfied with the scrubbing, rinse all components with warm water to remove any vinegar smell and ensure that no residue remains.
Vapers who have tried this method often note how quickly vinegar works to dissolve sticky residues. It’s an accessible hack that leaves no harsh chemical aftertaste.
- Personal Tips:
- If you find the smell of vinegar overwhelming, you can infuse it with lemon for a more pleasant fragrance.
- After rinsing, liven up your pods by letting them sit out in a sunny spot for a bit to dry and air out. Sunlight can naturally sanitize while giving them a fresh scent.
Employ Rubbing Alcohol
Rubbing alcohol, often hailed as a multitasker in many households, can also become your best friend when it comes to vape pod maintenance. It is particularly effective against tough stains, buildup, and sanitization.
- Why Use Rubbing Alcohol?:
- Rubbing alcohol not only disinfects but also evaporates quickly without leaving any residue. It is particularly valuable for deep cleaning, making it ideal when you need to clean vape coils or those pesky spots that just won't come off.
- This product can also eliminate bacteria, offering an additional layer of protection.
- How to Clean with Rubbing Alcohol:
- Prepare the Solution: Use isopropyl alcohol (at least 70% concentration) for optimal effectiveness. You can dilute it with a little water if it's too potent for certain components.
- Soak Components: Place the disassembled parts in a bowl and submerge them in the alcohol solution. Let them sit for about 5-10 minutes to ensure the solution penetrates the residue.
- Wipe and Scrub: After soaking, grab a cotton swab or a soft cloth, dip it in the alcohol, and scrub the components thoroughly. Focus particularly on areas that are prone to build-up, like the coils and the pod chamber.
- Rinse and Dry:
- Just like with the vinegar method, rinse the components well with warm water to remove traces of alcohol.
- Use a soft cloth to dry off the parts, ensuring thorough drying, particularly for the coil and any electronic components.
Users have frequently shared their success stories regarding using rubbing alcohol—many stating it completely revitalizes their vaping experience, especially where flavor clarity is concerned.
- Personal Insights:
- Always ensure that you perform the cleaning in a ventilated area, as the smell of alcohol can be strong.
- Keep your rubbing alcohol away from direct heat sources since it is flammable. Using it safely is just as important as the cleaning itself!
Regular Cleaning Schedule
One of the most effective ways to keep your Smok vape pods in tip-top shape is by establishing a regular cleaning schedule. It's often said, “prevention is better than cure,” and this principle holds true in vaping maintenance.
- Why Establish a Routine?:
- Consistent cleaning reduces the frequency and intensity of deep cleans. By taking care of your pod regularly, you stave off heavy build-up and issues that may arise.
- Regular cleaning also helps to enhance flavor consistency, as stale residues can compromise the taste of your e-liquids.
- Creating a Cleaning Schedule:
- Weekly Clean: Depending on your vaping frequency, aim for a quick clean every week. This might simply involve rinsing components and a brief soak in vinegar or alcohol.
- Deep Clean Bi-weekly: Every few weeks, make it a point to execute a thorough clean, soaking the components longer and scrubbing away.
- Coil Replacement: Track how often you’re replacing your coils. Regularly burnt coils can produce unpleasant flavors and need to be addressed. Clean your coils before replacing them if they’re reusable to extend their life.
- Stay Alert:
- Keep an eye out for any signs that your pod needs immediate attention. If you notice off flavors or a significant drop in vapor production, it might be time for a cleaning, even if it’s not on the schedule.
- Create a Reminder:
- Use a digital calendar or any reminder app on your phone to alert you of your cleaning days. A simple ping can go a long way in ensuring you maintain your vaping equipment.
Many vapers advocate that adhering to a cleaning schedule not only elevates the overall experience but also instills a sense of care and responsibility for their devices.
- Testimonies:
- Many users find that by simply committing to a routine, they can enjoy a consistently fresh and satisfying vape without as much hassle. Taking a little time each week can prevent large build-ups and larger cleaning efforts down the line!
Conclusion
In conclusion, maintaining the cleanliness of your Smok vape pods doesn’t have to be a complicated or labor-intensive process. By implementing these DIY cleaning hacks, including using vinegar and rubbing alcohol, as well as establishing a regular cleaning schedule, you can enjoy a refreshing vaping experience every time.
Remember, a clean pod means better flavor and performance, allowing you to get the most out of your chosen e-liquids. So grab those household items, set a schedule, and your vape will thank you for the extra care! Happy vaping!
A Step-by-Step Guide to Easily Clean Your Smok Vape Pods 🧼
Keeping your Smok vape pods clean is essential for maintaining flavor quality and extending the life of your device. In this guide, we’ll walk you through the steps to effectively clean your vape pods, ensuring a smooth vaping experience. Let’s get started! 🚀
What You’ll Need 🛠️
- Warm water
- Isopropyl alcohol (optional)
- Cotton swabs
- Soft cloth or paper towels
- A small bowl
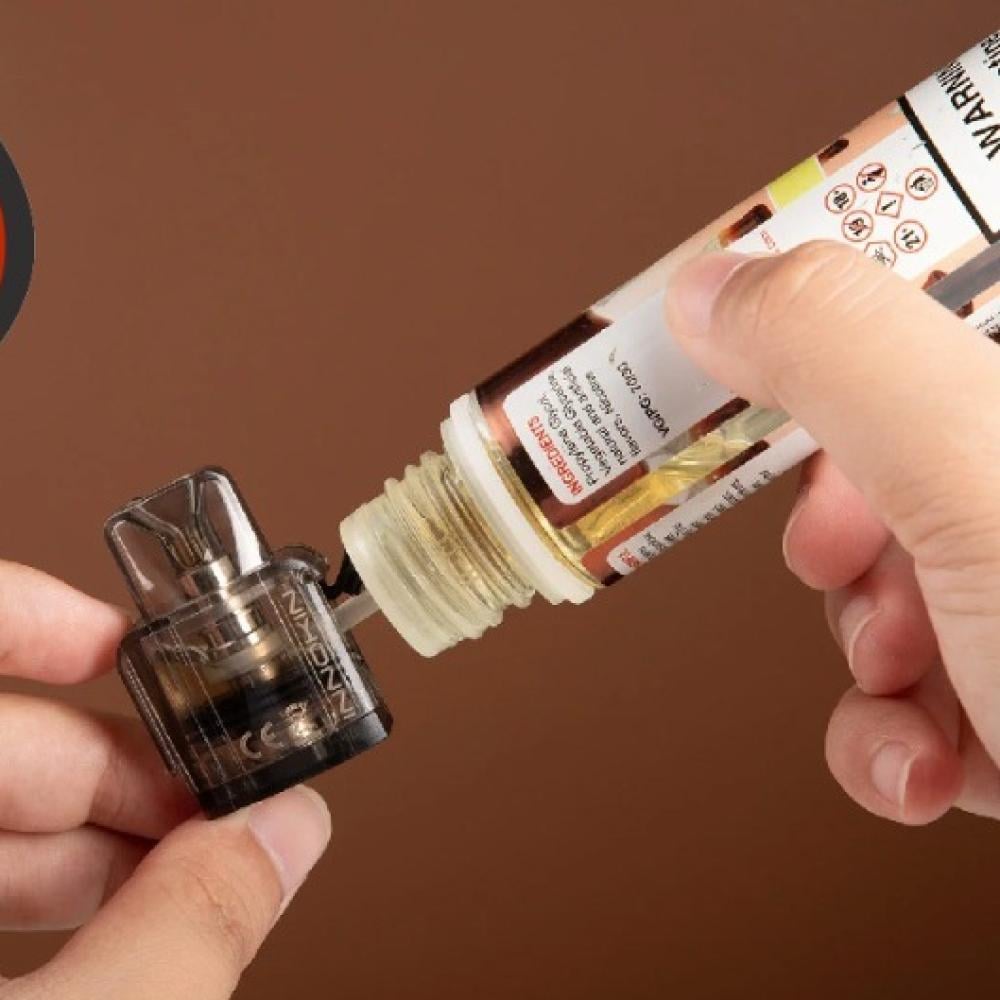
Step 1: Disassemble Your Pod 🔧
Begin by removing the pod from your device. If your pod has a removable coil, take it out as well. This will allow you to clean all components thoroughly.
Step 2: Rinse with Warm Water 💧
Fill a small bowl with warm water. Submerge the pod and any removable parts in the water for a few minutes. This will help loosen any residue or buildup. Avoid using hot water, as it can damage the pod.
Step 3: Clean with Isopropyl Alcohol (Optional) 🧴
For a deeper clean, you can use isopropyl alcohol. Dampen a cotton swab with alcohol and gently wipe the inside of the pod and around the connections. This step is particularly useful for removing stubborn residue.
Step 4: Rinse Again 🚿
After cleaning, rinse the pod and parts under warm water to remove any remaining alcohol or debris. Ensure that all cleaning agents are washed away.
Step 5: Dry Thoroughly 🧽
Use a soft cloth or paper towels to dry the pod and components thoroughly. Make sure no moisture remains, as this can affect the performance of your vape.
Step 6: Reassemble Your Pod 🔄
Once everything is dry, reinsert the coil (if applicable) and snap the pod back into your device. Ensure that everything fits snugly.
Step 7: Prime Your Coil (If Needed) 🌱
If you replaced the coil, remember to prime it by adding a few drops of e-liquid to the wick before vaping. This will prevent dry hits and ensure optimal flavor.
Conclusion 🎉
Cleaning your Smok vape pods regularly can enhance your vaping experience and prolong the life of your device. By following these simple steps, you can maintain the flavor and performance of your vape pods. Happy vaping! 💨

DIY Cleaning Hacks for Your Smok Vape Pods: A User's Guide
Keeping your Smok vape pods clean is essential for maintaining optimal performance, ensuring the best flavor, and prolonging the lifespan of your device. Regular maintenance can prevent issues like clogged airflow, burnt hits, and reduced battery life. This user’s guide offers DIY cleaning hacks to help you effectively clean your Smok vape pods at home.
Table of Contents
- Preparation and Safety
- Tools and Materials Needed
- Step-by-Step Cleaning Process
- Cleaning the Exterior
- Cleaning the Mouthpiece and Airflow
- Cleaning the Pod Connection
- Deep Cleaning for Persistent Residue
- Drying and Reassembly
- Additional Maintenance Tips
- Warnings and Precautions
- Conclusion
1. Preparation and Safety
Before you begin cleaning your Smok vape pods, it's crucial to ensure safety and prepare your workspace:
- Power Off: Always turn off your device and disconnect it from any power source.
- Disassemble Carefully: Gently remove the pod from the battery to avoid damaging any components.
- Work in a Clean Area: Choose a well-lit, clutter-free workspace to prevent losing small parts.
2. Tools and Materials Needed
Gather the following items to facilitate an effective cleaning process:
- Isopropyl Alcohol (90% or higher)
- Cotton Swabs/Q-tips
- Soft Cloth or Microfiber Towel
- Distilled Water
- Small Bowl or Container
- Toothpick or Soft Brush
- Paper Towels or Lint-Free Tissues
- Compressed Air (optional)
3. Step-by-Step Cleaning Process
A. Cleaning the Exterior
- Wipe Down the Surface:
- Use a soft cloth or microfiber towel dampened with a small amount of distilled water to gently wipe the exterior of the pod.
- Remove any visible dirt, oil, or residue.
- Disinfect if Necessary:
- For a more thorough clean, lightly dampen the cloth with isopropyl alcohol and wipe the surfaces.
- Ensure no excess liquid seeps into the pod’s openings.
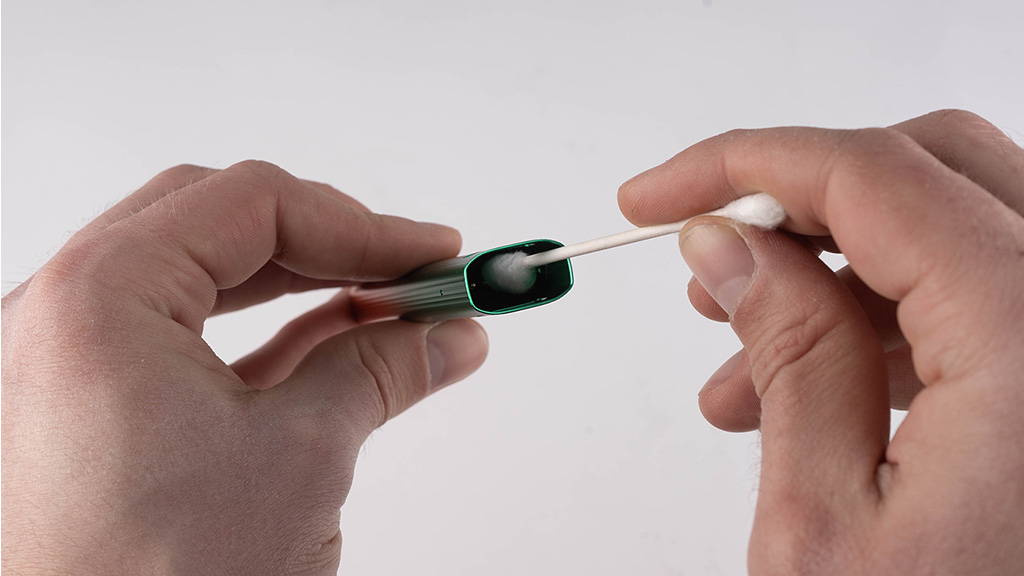
B. Cleaning the Mouthpiece and Airflow
- Remove the Mouthpiece:
- Carefully unscrew or detach the mouthpiece from the pod, depending on the model.
- Soak the Mouthpiece:
- Place the mouthpiece in a small bowl with warm, distilled water mixed with a few drops of isopropyl alcohol.
- Let it soak for about 10-15 minutes to loosen any stubborn residue.
- Scrub Gently:
- Use a cotton swab or soft brush to gently scrub the inside of the mouthpiece.
- Pay special attention to the airflow holes, ensuring they are free from blockage.
- Rinse and Dry:
- Rinse the mouthpiece thoroughly with distilled water to remove any alcohol residue.
- Pat dry with a paper towel and allow it to air dry completely before reattaching.
C. Cleaning the Pod Connection
- Inspect the Connection Points:
- Examine the metal contacts where the pod connects to the battery.
- Look for any signs of buildup or discoloration.
- Clean the Contacts:
- Dampen a cotton swab with isopropyl alcohol.
- Gently rub the metal contacts to remove any residue or oxidation.
- Use a dry cotton swab to remove excess moisture.
- Use Compressed Air (Optional):
- For hard-to-reach areas, use compressed air to blow out any remaining debris.
- Ensure the pod is completely dry before reassembling.
4. Deep Cleaning for Persistent Residue
If your vape pod has stubborn residue or buildup, follow these additional steps:
- Disassemble the Pod:
- Carefully separate all removable parts, including the coil if possible.
- Soak Components Separately:
- Soak the coil and other removable parts in a mixture of warm water and isopropyl alcohol for 30 minutes.
- Avoid soaking non-removable parts to prevent damage.
- Scrub and Rinse:
- Use a soft brush or toothbrush to gently scrub the soaked components.
- Rinse thoroughly with distilled water to remove all cleaning agents.
- Dry Completely:
- Allow all parts to air dry on a clean paper towel for several hours or overnight.
- Ensure no moisture remains before reassembling to prevent electrical issues.
5. Drying and Reassembly
- Ensure Complete Dryness:
- Before reassembling, make sure all parts are entirely dry to avoid any potential short circuits or flavor contamination.
- Reassemble the Pod:
- Carefully put the pod back together, ensuring all components fit snugly and correctly.
- Prime the Coil (If Applicable):
- If you disassembled the coil, prime it by applying a few drops of e-liquid to the cotton wicks before use.
- Test the Device:
- Power on the device and take a few test puffs to ensure everything is functioning correctly.
6. Additional Maintenance Tips
- Regular Cleaning Schedule: Establish a routine cleaning schedule (e.g., once a week) to maintain optimal performance.
- Avoid Overfilling: Prevent e-liquid spills by not overfilling the pod, reducing the need for frequent cleanings.
- Use High-Quality E-Liquids: High-quality liquids produce less residue, making cleaning easier.
- Store Properly: Keep your device and pods in a clean, dry place to minimize dust and debris accumulation.
7. Warnings and Precautions
- Handle with Care: Vape pods are delicate; apply gentle pressure when cleaning to avoid damage.
- Avoid Excess Moisture: Prevent liquid from entering the device’s internal components to avoid malfunction.
- Use Appropriate Cleaners: Only use isopropyl alcohol and distilled water. Harsh chemicals can damage the pod and pose health risks.
- Check for Damage: After cleaning, inspect the pod for any signs of wear or damage. Replace if necessary to ensure safety and performance.
8. Conclusion
Maintaining clean Smok vape pods is a straightforward process that can significantly enhance your vaping experience. By following these DIY cleaning hacks, you can ensure that your pods deliver consistent flavor, smooth airflow, and reliable performance. Regular maintenance not only preserves the quality of your device but also extends its lifespan, providing you with a better and more satisfying vaping experience.
Disclaimer: Vaping involves the use of nicotine, which is an addictive substance. Always vape responsibly and be aware of the health risks associated with nicotine consumption. If you have any health concerns, consult a healthcare professional before using vaping products.
OXVA is a leading brand in the field of manufacturing vape products.
Elf Bar is a leading e-cigarette brand, known for offering ready-to-use vape devices.
Geek Vape is one of the leading companies in the vape devices and related accessories industry.
DZRT Nicotine Pouches is one of the brands specialized in nicotine pouches.
Ripe Vapes is a well-known company in the manufacture of electronic cigarettes and e-liquids (flavors).
Roll Upz is a well-known brand in the e-liquid industry.
Grand Vape (or Grand) is one of the companies specialized in manufacturing vape devices and electronic liquids.
Browse by most popular vape brands
Gummy is a specialty brand.
SMOK is one of the most popular brands.
Sams Vape is a well known brand.
DR.VAPES Dr.Vapes is one of the well-known companies
JUCY JUCY Flavors are a range of flavors used in electronic vaping.
Browse by most popular vape brands
Products of the brand Mood Vape Company
Disposable disposable syringes
Electronic vape and hookah devices
Salt and vape flavors for molasses and electronic hookah
Accessories, coils, supplies and pods for electronic devices