

Welcome to VapeMaster - Your Ultimate Resource for Clean Vape Coils
At VapeMaster, we understand the importance of maintaining your vape for optimal performance and flavor. Our comprehensive guides and expert tips on cleaning vape coils are designed to help you extend the life of your device and enhance your vaping experience.
**Explore Our Top Resources:**
1. **Step-by-Step Guide: How to Effectively Clean Your Vape Coils** - Learn the essential steps for a thorough clean.
2. **Extend the Life of Your Vape: Tips for Cleaning Coils** - Discover practical techniques to prolong your coil's lifespan.
3. **The Ultimate Vape Coil Cleaning Cheat Sheet: What You Need to Know** - Quick access to the must-know facts about coil cleaning.
4. **Keep Your Flavor Fresh: Essential Techniques for Cleaning Vape Coils** - Ensure a fresh taste with these cleaning methods.
5. **Why Cleaning Your Vape Coils is Crucial for Optimal Performance** - Understand the impact of clean coils on your vaping experience.
6. **DIY Vinegar and Baking Soda Solutions for Sparkling Clean Vape Coils** - Simple, at-home solutions for spotless coils.
7. **Signs Your Vape Coils Need Cleaning: Don't Ignore These Warning Signs!** - Learn to recognize when it's time for a clean.
8. **Cleaning Vape Coils: A Complete Beginner’s Guide** - Perfect for those new to vaping, clear instructions included.
9. **Pro Tips from Vaping Experts: Best Practices for Coil Maintenance** - Expert insights to keep your device in top condition.
10. **Safe and Simple: The Best Methods to Clean Your Vape Coils at Home** - Easy and effective cleaning techniques for everyone.
Join us at VapeMaster to ensure your vape is always performing at its best. With our expert guidance, you'll keep your coils clean and enjoy the ultimate vaping experience every time. Explore our resources today and take the first step towards a cleaner, better-tasting vape!

Step-by-Step Guide: How to Effectively Clean Your Vape Coils
Maintaining your vape coils is essential for optimal flavor and performance. Here’s a straightforward, step-by-step guide that will help you clean your vape coils effectively.
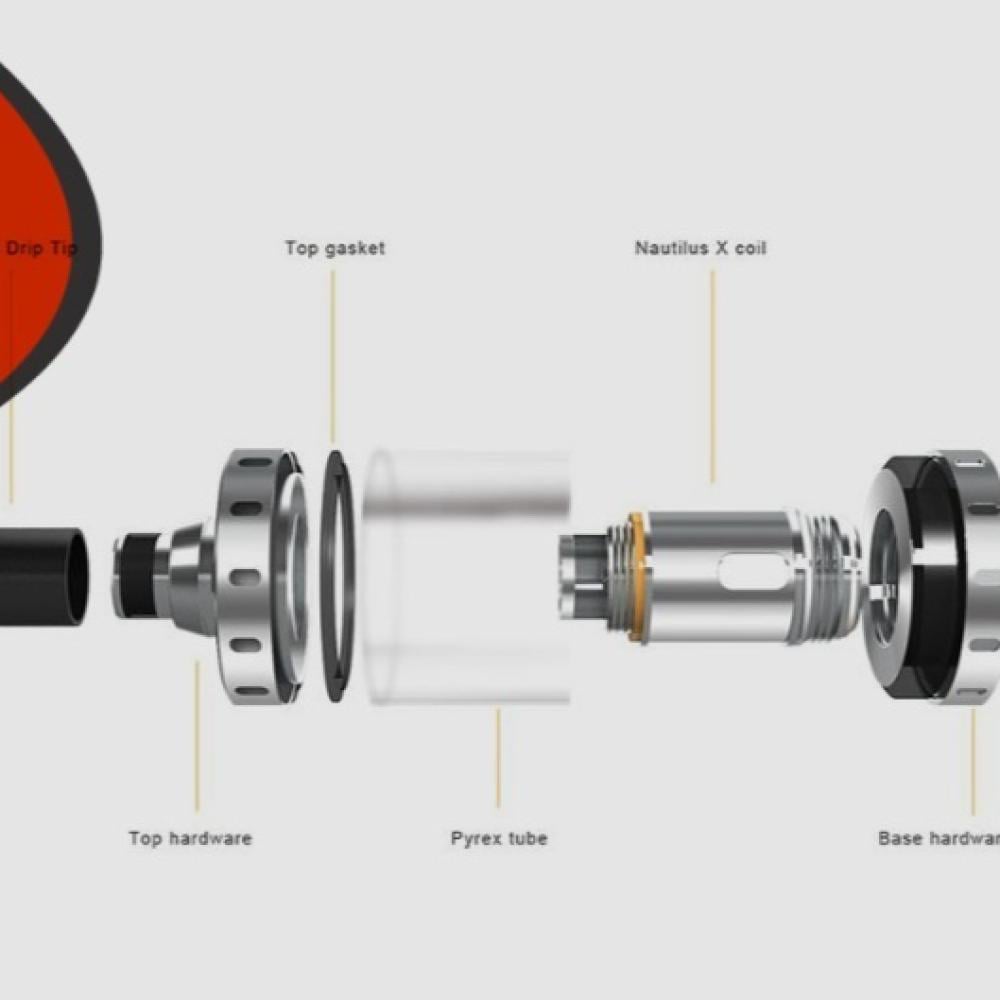
Disassemble Your Vape Device
Start by carefully taking apart your vape device. Depending on the model, this may involve unscrewing the tank from the battery or carefully removing the coil from the tank. Be sure to place all the parts on a clean surface to avoid losing any small components.
- Separate the tank from the mod.
- Remove the existing coil, noting how it connects for easier reassembly later.
Taking apart your device will allow access to clean components properly, helping to achieve the best results in flavor rebound.
Rinse the Coil Under Running Water
Once disassembled, rinse the coil under running water. This step removes any immediate residue or leftover e-liquid that has built up.
- Ensure the water is warm, but not boiling.
- Gently apply some pressure to help dislodge any stubborn residue.
This initial rinse is crucial as it helps to wash away the tar-like buildup that can affect performance.
Soak the Coil in a Cleaning Solution
Next, prepare a cleaning solution. Options include vinegar for a natural approach or specialized vape coil cleaners.
- For a vinegar solution: Mix equal parts vinegar and water.
Submerge the coil in the solution for 30-60 minutes, letting it break down any remaining grime.
Rinse Again and Dry
After soaking, rinse the coil thoroughly under running water to wash away any cleaning solution residue. At this point, you’ll notice the coil may look visibly cleaner, reviving its original shine.
- Shake off excess water or use a paper towel to gently pat dry.
Proper drying is vital to avoid any unwanted taste from residual cleaning products.
Reassemble Your Vape
Finally, it's time to reassemble your device. Carefully follow the order in which you disassembled each component.
- Reconnect the cleaned coil to the tank.
- Screw the tank back onto the mod snugly.
Congratulations! You've successfully cleaned your vape coils, ensuring them ready for your next vaping session. Enjoy the enhanced flavors and improved performance!
Extend the Life of Your Vape: Tips for Cleaning Coils
Once you've successfully cleaned your vape coils, it’s essential to keep them in great condition for the long haul. Here are some helpful tips to extend the life of your vape:
Regular Maintenance
Just like any other device, regular maintenance can make a world of difference. Establish a cleaning routine to prevent residue buildup.
- Daily checks: Give your device a quick once-over to see if it needs any cleaning. Regularly changing your e-liquid can also help keep coils fresh.
- Weekly rinsing: Simply rinsing your coils under warm water once a week can greatly increase longevity.
A personal habit of mine is to set a reminder on my phone every Sunday evening. It’s a perfect way to keep my vape in top shape and my flavors intact.
Avoid Harsh Chemicals
While it can be tempting to grab whatever household cleaner is handy, using harsh chemicals can damage your coils.
- Stick to gentle solutions: As mentioned earlier, vinegar and warm water are effective and safe.
- Avoid bleach or ammonia-based products, which can leave residues and impair vaping quality.
Using the right cleaning agents not only preserves the integrity of the coil but helps maintain that sweet, clean flavor that vapers crave.
Proper Drying
After cleaning your coils, proper drying is crucial to prevent any unwanted flavors when vaping.
- Allow coils to air dry for at least an hour before reassembling your device.
- Use a paper towel to gently dab off excess water if you’re in a hurry, just be cautious not to leave fibers behind.
After implementing these simple tips, vapers can enjoy a prolonged life for their coils, optimizing both flavor and performance while making the cleaning process a breeze. Happy vaping!
The Ultimate Vape Coil Cleaning Cheat Sheet: What You Need to Know
Keeping your vape coils clean is not just about improving flavor; it’s about ensuring a long-lasting experience. Here’s your ultimate cheat sheet that highlights essential practices for keeping your coils in top shape.
Daily Rinsing
A simple daily rinse can make a significant difference in your vaping experience. It’s a quick and effective way to maintain the cleanliness of your coils.
- Quick rinse: Just run your coils under warm water for a few seconds. This helps remove any lingering residue from the previous day's use.
- Visual check: During your rinse, take a moment to observe the coil for any visible buildup. This habit can save you the trouble of tackling heavy grime later.
I personally find that making it a part of my morning ritual has helped maintain the freshness of my flavors without adding much time to my routine.
Bi-Weekly Deep Clean
While daily rinsing is valuable, a comprehensive cleaning every two weeks can rejuvenate your coils even further.
- Soak in a cleaning solution: Use warm water mixed with vinegar or a specialized cleaning agent to deep clean your coils. Let them soak for about 30 minutes.
- Thorough scrubbing: After soaking, gently scrub using a soft brush to remove stubborn residue.
This deep clean not only extends the life of your coils but also reclaims that perfect taste you enjoy when you first start using a new coil.
Proper Storage
Proper storage of your vape device and its components can significantly impact coil performance.
- Keep it dry: Store in a cool, dry place away from direct sunlight to prevent moisture buildup.
- Avoid flavor contamination: If switching flavors frequently, consider keeping extra tanks on hand to prevent cross-flavor contamination.
Taking these simple steps ensures everything remains ready for your next vaping session. By integrating these practices into your routine, you can prolong the life of your vape coils and fully enjoy every puff.
Keep Your Flavor Fresh: Essential Techniques for Cleaning Vape Coils
Maintaining the freshness of your vape flavor is crucial for an enjoyable experience. If you’re looking for effective methods to clean your vape coils, here are three essential techniques that will keep your coils performing at their best.
Lemon Juice Soak
One of the most refreshing methods is to use lemon juice due to its natural acidity, which breaks down buildup effectively.
- Create a solution: Mix equal parts lemon juice and warm water.
- Soak your coils for about 30 minutes. The citric acid works wonders in removing any stubborn grime.
I tried this method after noticing a lingering taste from an old e-liquid, and I was blown away by the results! Not only did the coils come out cleaner, but my vape flavor returned to its vibrant self.
Dry Burn Method
The dry burn method is a great option, especially for rebuildable atomizers. This method helps to clear any residual gunk that may be trapped in the coil.
- Remove the coil from the tank and reinstall it onto your device without any cotton.
- Fire the coil briefly while pulsing the fire button. You'll see the debris ignite and burn away.
Professional vapers often swear by this method. Just ensure you perform this technique cautiously to avoid damaging the coil or creating burnt spots.
Use Salt
Using salt as an abrasive can provide an effective cleaning solution without the use of harsh chemicals.
- Prepare a mix: Combine salt with warm water to create a cleaning solution.
- Soak your coils in the mixture for 15-20 minutes. The grains of salt help scrub away stubborn residue when rinsed off.
Using salt reminds me of the DIY approaches of my kitchen experiments! It’s simple, effective, and leaves my coils looking fresh.
By employing these techniques, vapers can enjoy a burst of flavor and a satisfying experience. Keep these methods in your regular cleaning routine, and you’ll always have a delightful vape waiting for you.
Why Cleaning Your Vape Coils is Crucial for Optimal Performance
Cleaning your vape coils isn’t just a chore; it’s a fundamental step to ensuring that your vaping experience remains enjoyable and efficient. Maintaining clean coils can make a significant difference in both flavor and the longevity of your device, so let’s explore why it’s essential.
Better Flavor
One of the immediate benefits of cleaning your vape coils is the enhancement of flavor. Over time, residue from e-liquids can accumulate in the coils, leading to a burnt or muted taste.
- Experience the difference: With fresh, clean coils, every draw becomes a revelation. A clean coil allows the true flavors of your e-liquid to shine through.
- Personal experience: I remember transitioning from a stale vape flavor to a refreshing burst of sweetness after a thorough cleaning—like the difference between day and night!
Not only does cleaning contribute to better taste, but it can also prevent any unwanted flavor contamination when switching between different e-liquids.
Longer Coil Life
Regular cleaning also extends the life of your coils, saving you money in the long run.
- Efficiency matters: A clean coil heats evenly, reducing wear and tear and ensuring consistent performance.
- Budget-friendly: By implementing a cleaning routine, I found I could stretch the life of my coils significantly, giving my wallet a break from frequent replacements.
Investing a little time into cleaning your coils can lead to increased efficiency and improved performance, making your vaping sessions more enjoyable. By understanding the importance of coil cleanliness, vapers can enjoy richer flavors and longer-lasting enjoyment from their devices.
DIY Vinegar and Baking Soda Solutions for Sparkling Clean Vape Coils
When it comes to cleaning your vape coils, you don’t always need fancy cleaning products. Sometimes, the best solutions are already in your kitchen! Vinegar and baking soda are excellent, natural cleaners that can help you achieve sparkling clean coils without the use of harsh chemicals. Let’s look at how to use each of them effectively.
Vinegar Solution
Vinegar is a powerhouse when it comes to cutting through grime, and it’s safe to use on vape coils.
- Preparation: Mix equal parts of white vinegar and warm water in a bowl.
- Soaking: Submerge your coils in this solution for about 30–60 minutes, allowing the acetic acid to break down any buildup.
I remember the first time I used this method; I was skeptical about its effectiveness. However, after soaking, I was amazed at how much residue had lifted away—my coils looked almost brand new!
Baking Soda Paste
Baking soda is another versatile cleaning agent, especially effective for scrubbing away tough residue due to its mild abrasiveness.
- Creating the paste: Mix baking soda with a few drops of water to form a thick paste.
- Application: Apply this paste directly onto the coils using a soft brush or cloth. Gently scrub until you see that grime dissolving.
After using this technique, I often see the coils shining brightly. The combination of baking soda’s scrubbing power and its ability to neutralize odors ensures that my coils don’t just look clean; they also smell fresh!
By incorporating these DIY cleaning solutions into your routine, you’ll not only enhance the functionality of your vape coils but also embrace a cost-effective and eco-friendly approach to vaping maintenance.
Signs Your Vape Coils Need Cleaning: Don’t Ignore These Warning Signs!
Keeping an eye on your vape coils is essential for ensuring a stellar vaping experience. However, sometimes it can be easy to overlook the signals that indicate it’s time for a cleaning. Here are a few key signs that your coils need attention, so don’t ignore them!
Diminished Flavor
Are you noticing that your favorite e-liquid tastes stale or even burnt? A prominent sign that your vape coils need a good clean is diminished flavor.
- Taste degradation: Residue and buildup on the coils can clog the flavor profiles you love. If your vape juice no longer delivers the delicious experience it once did, it’s time to act.
- Personal anecdote: I recall the first time I experienced a significant drop in flavor. I was puzzled until I realized it was time for a thorough cleaning! After a simple rinse, my e-liquids tasted vibrant again.
Reduced Vapor Production
Another telltale sign that your coils are getting grimy is reduced vapor production.
- Thin clouds: If you find yourself reaching for your device more than usual but producing less vapor, the coils may be poorly functioning due to buildup.
- Breaking the cycle: After encountering this issue myself, I committed to more regular coil cleaning. I noticed that increasing vapor production meant a far more satisfying vaping experience.
Gurgling Noises
Lastly, if your vape makes gurgling noises, it’s a glaring indicator of an underlying problem.
- Fluid buildup: Gurgling often happens when liquid pools around the coil, often due to excessive residue or blockage.
- Quick fix required: This sound is not just annoying; it can also lead to leakage and further damage if ignored.
By paying attention to these warning signs, vapers can ensure their devices continue to provide the perfect balance of flavor and vapor. Keeping your coils clean means you can enjoy every puff to the fullest!
Cleaning Vape Coils: A Complete Beginner’s Guide
If you’re new to vaping, understanding how to clean your vape coils is essential for maintaining good flavor and optimal performance. This beginner’s guide will provide you with everything you need to know to get started on the right foot.
Gather Materials
Before diving into the cleaning process, gather all necessary materials. Being organized will make the task more efficient and prevent any mishaps.
- Essentials to collect:
- Warm water
- Vinegar or baking soda (optional for deep cleaning)
- A bowl for soaking
- Soft brushes or cotton swabs for scrubbing
- Paper towels for drying
Having everything at your fingertips makes the process smoother. I usually keep my cleaning “kit” in a designated drawer, so I’m ready to go whenever the need arises.
Follow Simple Steps
Once you have your materials, the steps to clean your coils are relatively straightforward:
- Disassemble your vape: Carefully take apart the tank and remove the coil.
- Rinse the coil: Quickly rinse it under running warm water to remove any excess liquid.
- Soak if needed: For deeper cleaning, soak it in a vinegar or baking soda solution for about 30 minutes.
- Scrub gently: Use a brush or swab to eliminate any stubborn residue, then rinse again.
Taking these steps helps keep your coils in prime condition. I always set a timer while soaking to make sure I don’t forget them in my busy schedule!
Reassemble and Enjoy
Once you’ve thoroughly cleaned your coils and they’re dry, it’s time to reassemble everything.
- Attach the coil back into the tank and connect it to the battery.
- Fill with e-liquid: Make sure to saturate the coil by allowing it to sit for a few minutes before taking your first puff.
Enjoy that fresh flavor and smooth vapor that comes from well-maintained coils! Following these simple steps not only ensures a better vaping experience but also instills a sense of satisfaction when you know you've taken care of your device. Happy vaping!
Pro Tips from Vaping Experts: Best Practices for Coil Maintenance
To truly elevate your vaping experience, incorporating expert tips into your coil maintenance routine can make a significant difference. Here are some pro tips that not only enhance your device's longevity but also improve flavor quality.
Pulse Drying
Pulse drying is a fantastic technique recommended by seasoned vapers.
- What it is: Instead of simply rinsing and leaving to air dry, you pulse fire the coil briefly after cleaning.
- How to do it: Attach the cleaned, dry coil to your device, press the fire button for short intervals without inhaling. This method helps burn off any remaining residue.
I’ve used this method after cleaning, and it certainly makes a noticeable difference in performance. It seems to help the coil regain its form, giving that fresh flavor a chance to shine when I start vaping again.
Use Soft Brushes
Cleaning coils effectively means having the right tools in your arsenal.
- Gentle but effective: Use a soft brush, such as an old toothbrush or a dedicated cleaning brush, to scrub away residue without damaging the coil.
- Why it matters: Using a soft brush prevents scratching the coil surface, which can lead to even more buildup over time.
I learned the hard way that a harsh scrubbing tool can ruin a coil, so investing in a few soft brushes makes all the difference!
Stay Consistent
Perhaps the most crucial tip is to remain consistent with your maintenance routine.
- Set a schedule: Consider establishing a cleaning routine based on your vaping frequency. For instance, I clean my coils every week if I’m a heavy vaper but bi-weekly for lighter use.
- Be proactive: By staying on top of coil maintenance, you’ll avoid drastic flavor drops or diminished vapor production.
Following these expert insights lends itself to a more enjoyable vaping journey and allows for maximum flavor rich experiences every time you puff. With just a little diligence, your coils will thank you!
Safe and Simple: The Best Methods to Clean Your Vape Coils at Home
Keeping your vape coils clean doesn't have to be a complicated task. There are several safe and simple methods you can use right at home to ensure your vaping experience remains enjoyable. Here’s a breakdown of three effective techniques to consider.
Hydrogen Peroxide
Using hydrogen peroxide is a powerful and straightforward way to clean your vape coils.
- Why it works: Its antibacterial properties make it excellent for breaking down residue.
- How to use it: Simply mix equal parts of hydrogen peroxide and warm water, and soak your coils for about 30 minutes.
When I first discovered this method, I was pleasantly surprised by how efficiently it worked. The buildup came off effortlessly, leaving my coils sparkling clean. Just remember to rinse thoroughly afterward to ensure no residual peroxide remains.
Nightly Rinsing
Incorporating a nightly rinsing ritual can significantly boost the longevity of your coils.
- Quick and easy: Just run your coils under warm water for a minute or two before bed, ensuring any leftover e-liquid is washed away.
- Stay vigilant: Nightly rinsing helps prevent sticky residue from building up, keeping your coils performing optimally.
This routine became part of my nightly ritual, and I’ve noticed my flavors remain fresher for much longer. It’s a small task that yields remarkable results!
Complete Drying
After cleaning, complete drying is essential to prevent any off-flavors when you vape.
- Follow the drying process: After rinsing, shake off excess water and lay the coils on a clean towel. Allow them to air dry completely for at least an hour.
- Avoid rush jobs: Trust me, rushing the drying process can lead to undesirable, watery flavors during your next vaping session.
By using these safe and simple methods, you can effectively clean your vape coils at home without any hassle. A little care goes a long way in maintaining flavorful and enjoyable vaping sessions!

Step-by-Step Guide: How to Effectively Clean Your Vape Coils
Step-by-Step Guide: How to Effectively Clean Your Vape Coils
Maintaining clean vape coils is essential for ensuring optimal performance, preserving flavor quality, and extending the lifespan of your vaping device. Over time, e-liquid residue and oils can accumulate on the coils, leading to reduced vapor production, altered flavors, and potential health risks. This comprehensive step-by-step guide will walk you through the process of effectively cleaning your vape coils to keep your vaping experience smooth and enjoyable.
1. Gather Necessary Supplies
Before you begin, ensure you have the following items on hand:
- Isopropyl Alcohol (90% or higher): Effective for dissolving e-liquid residues.
- Cotton Swabs or Toothpicks: For scrubbing and removing stubborn buildup.
- Paper Towels or a Clean Cloth: To dry the coils after cleaning.
- Gloves: To protect your hands from alcohol and residue.
- Small Container or Zip-Lock Bag: For soaking the coils.
- Cleaning Brush (Optional): A soft brush can help remove debris.
2. Disassemble Your Vape Device
Safety First:
- Turn Off the Device: Ensure your vape is turned off and disconnected from any power source to prevent accidental activation.
- Remove the Tank: Unscrew or detach the tank from the battery or mod.
- Take Out the Coils: Carefully remove the coils from the tank. Refer to your device’s manual for specific instructions, as the disassembly process may vary between models.
3. Rinse the Coils with Warm Water
Initial Cleaning:
- Hold Under Warm Water: Place the coils under warm (not hot) running water. This helps remove loose e-liquid and surface residue.
- Gently Shake: Gently shake the coils to dislodge any remaining liquid and debris.
- Avoid Excessive Water: Ensure that only the coil is rinsed and not other parts of the device that could be damaged by water.
Note: If you're using reusable or rebuildable atomizers, ensure they are thoroughly dry before reassembling to prevent damage.
4. Soak the Coils in Isopropyl Alcohol
Deep Cleaning:
- Fill the Container: Pour enough isopropyl alcohol into a small container or zip-lock bag to fully submerge the coils.
- Soak Duration: Allow the coils to soak for at least 30 minutes. For heavily soiled coils, soaking for up to 2 hours can be more effective.
- Agitate Occasionally: Gently agitate the container or bag to help the alcohol penetrate and dissolve the residue.
Warning: Isopropyl alcohol is flammable and should be handled with care. Avoid inhaling fumes and ensure you’re working in a well-ventilated area.
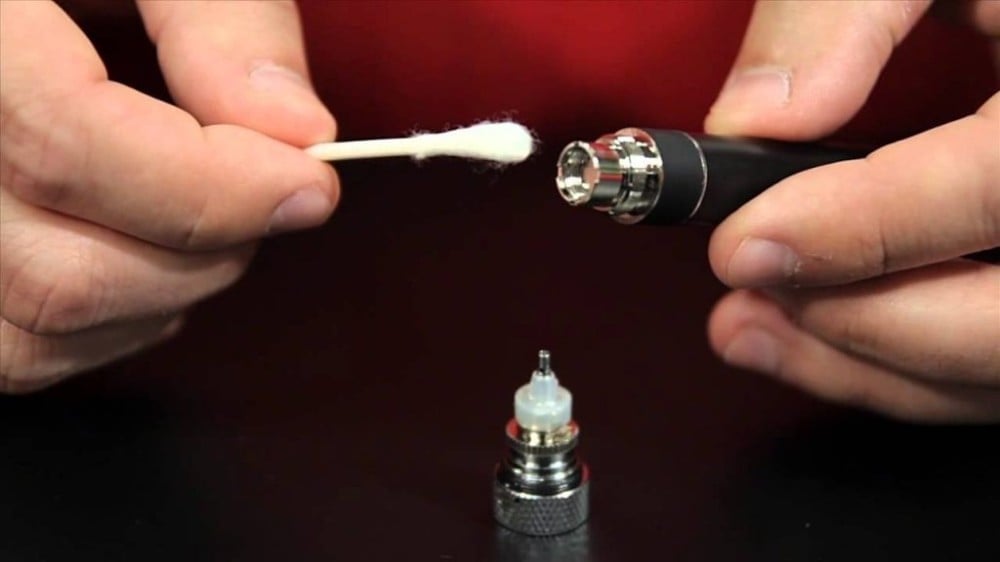
5. Scrub the Coils to Remove Residue
Removing Stubborn Buildup:
- Use Cotton Swabs or Toothpicks: After soaking, use cotton swabs or toothpicks to gently scrub the coils, focusing on areas with visible buildup.
- Employ a Cleaning Brush (Optional): A soft brush can help remove stubborn residues without damaging the coil material.
- Be Gentle: Avoid using excessive force to prevent tearing or deforming the coils.
6. Rinse the Coils Thoroughly
Removing Alcohol and Residue:
- Rinse Under Running Water: Place the coils under warm running water again to wash away any remaining alcohol and loosened residues.
- Shake Off Excess Water: Gently shake the coils to remove as much water as possible without forcing it through the wick.
7. Dry the Coils Completely
Ensuring No Moisture Remains:
- Pat Dry with Paper Towels or a Clean Cloth: Gently pat the coils to remove surface moisture.
- Air Dry: Allow the coils to air dry in a well-ventilated area for several hours or overnight. Ensure they are completely dry before reassembling to prevent electrical issues or poor performance.
8. Reassemble Your Vape Device
Putting It Back Together:
- Install the Dry Coils: Once the coils are fully dry, carefully place them back into the tank or atomizer.
- Reattach the Tank: Screw or snap the tank back onto the battery or mod, ensuring a secure fit.
- Prime the Coils: Add a few drops of e-liquid directly onto the coils before filling the tank. This helps saturate the wick and prevents dry hits.
9. Fill the Tank with E-Liquid
Final Steps:
- Use High-Quality E-Liquid: Choose e-liquids that suit your vaping preferences and ensure they are compatible with your device.
- Avoid Overfilling: Fill the tank to the recommended level to prevent leaks and ensure optimal performance.
- Let It Sit: Allow the tank to sit for a few minutes to let the e-liquid fully saturate the coils before vaping.
10. Test Your Device
Ensuring Proper Function:
- Turn On the Device: Power on your vape and take a few gentle puffs to ensure everything is working correctly.
- Check for Improved Flavor and Vapor: The coils should now produce consistent flavor and vapor without any burnt or off-tastes.
- Monitor Performance: Pay attention to any changes in performance and repeat the cleaning process if necessary.
Tips for Maintaining Clean Vape Coils
- Regular Cleaning: Clean your coils regularly, especially if you vape frequently or use e-liquids with high VG content.
- Proper Storage: Store your vape device in a clean, dry place to prevent residue buildup and prolong coil life.
- Use High-Quality E-Liquids: Quality e-liquids with balanced PG/VG ratios and natural flavors produce less residue.
- Avoid Chain Vaping: Give your coils time to re-saturate with e-liquid between puffs to prevent overheating and dry hits.
- Replace Coils When Necessary: Even with regular cleaning, coils will eventually wear out and should be replaced to maintain optimal performance.
Conclusion
Effectively cleaning your vape coils is a simple yet crucial maintenance task that can significantly enhance your vaping experience. By following this step-by-step guide, you can ensure that your coils remain in good condition, providing consistent flavor and vapor production while extending their lifespan. Regular cleaning not only improves performance but also promotes a healthier vaping habit by reducing the risk of inhaling burnt residues. Remember to handle all components with care and prioritize safety throughout the cleaning process.
Disclaimer: Vaping carries health risks, including potential addiction and exposure to harmful substances. This guide is for informational purposes only and does not endorse or promote vaping. If you have health concerns related to vaping, consult a healthcare professional.
OXVA is a leading brand in the field of manufacturing vape products.
Elf Bar is a leading e-cigarette brand, known for offering ready-to-use vape devices.
Geek Vape is one of the leading companies in the vape devices and related accessories industry.
DZRT Nicotine Pouches is one of the brands specialized in nicotine pouches.
Ripe Vapes is a well-known company in the manufacture of electronic cigarettes and e-liquids (flavors).
Roll Upz is a well-known brand in the e-liquid industry.
Grand Vape (or Grand) is one of the companies specialized in manufacturing vape devices and electronic liquids.
Browse by most popular vape brands
Gummy is a specialty brand.
SMOK is one of the most popular brands.
Sams Vape is a well known brand.
DR.VAPES Dr.Vapes is one of the well-known companies
JUCY JUCY Flavors are a range of flavors used in electronic vaping.
Browse by most popular vape brands
Products of the brand Mood Vape Company
Disposable disposable syringes
Electronic vape and hookah devices
Salt and vape flavors for molasses and electronic hookah
Accessories, coils, supplies and pods for electronic devices