

Welcome to [Vape Saudi Arabia] - Your Ultimate Resource for Vape Tank Cleaning and Maintenance
Are you looking for the best ways to keep your vape tank in top-notch condition? You’re in the right place. Our comprehensive Step-by-Step Guide: How to Clean Your Vape Tank Like a Pro will walk you through everything you need to know about maintaining your vape for the best performance.
Our experts share Essential Tips for Cleaning Your Vape Tank, ensuring you Keep It Fresh and enjoy optimal flavor with every puff. Dive into Vape Maintenance 101 with us, where we disclose the secrets to Cleaning Your Tank for Optimal Flavor without any hassle.
Learn about The Dos and Don'ts of Vape Tank Cleaning to avoid any pitfalls, and explore A Complete Guide to Disassembling and Cleaning Your Vape Tank for a thorough and effective cleanse. Understand Why Regular Cleaning of Your Vape Tank Matters and how it improves the longevity and performance of your device.
You might wonder, How Often Should You Clean Your Vape Tank? Our resources offer insights and recommendations tailored to your vaping habits. Equip yourself with the Tools You Need for a Thorough Vape Tank Cleaning and learn how to breeze through the process.
Avoiding Common Mistakes When Cleaning Your Vape Tank is vital, and we've got you covered with practical advice and expert insights. Finally, discover how you can Revive Your Vape with our Expert Tips for a Sparkling Clean Tank, ensuring every vape experience is a delightful one.
Trust [Your Company Name] to guide you through every aspect of vape care and maintenance, helping you enjoy a superior vaping experience time and time again. Browse our site for more tips, tricks, and guides today!

Keep It Fresh: Essential Tips for Cleaning Your Vape Tank
When it comes to maintaining your vaping experience, keeping your vape tank clean is paramount. A clean vape tank not only enhances flavor but also prolongs the life of your equipment. Here are some essential tips to ensure your tank remains pristine.
Disassemble with Care
Before diving into the cleaning process, it’s crucial to disassemble your vape tank carefully. Start by removing the tank from your device. Once detached, take your time and gently unscrew any components such as the coil and mouthpiece. Remember, different models may require specific methods, so refer to your user manual if needed.
A quick checklist for disassembly:
- Remove the mouthpiece.
- Unscrew the tank from the battery.
- Take out the coil.
Be patient! A hasty disassembly can lead to damaged threads or seals, which can affect performance.
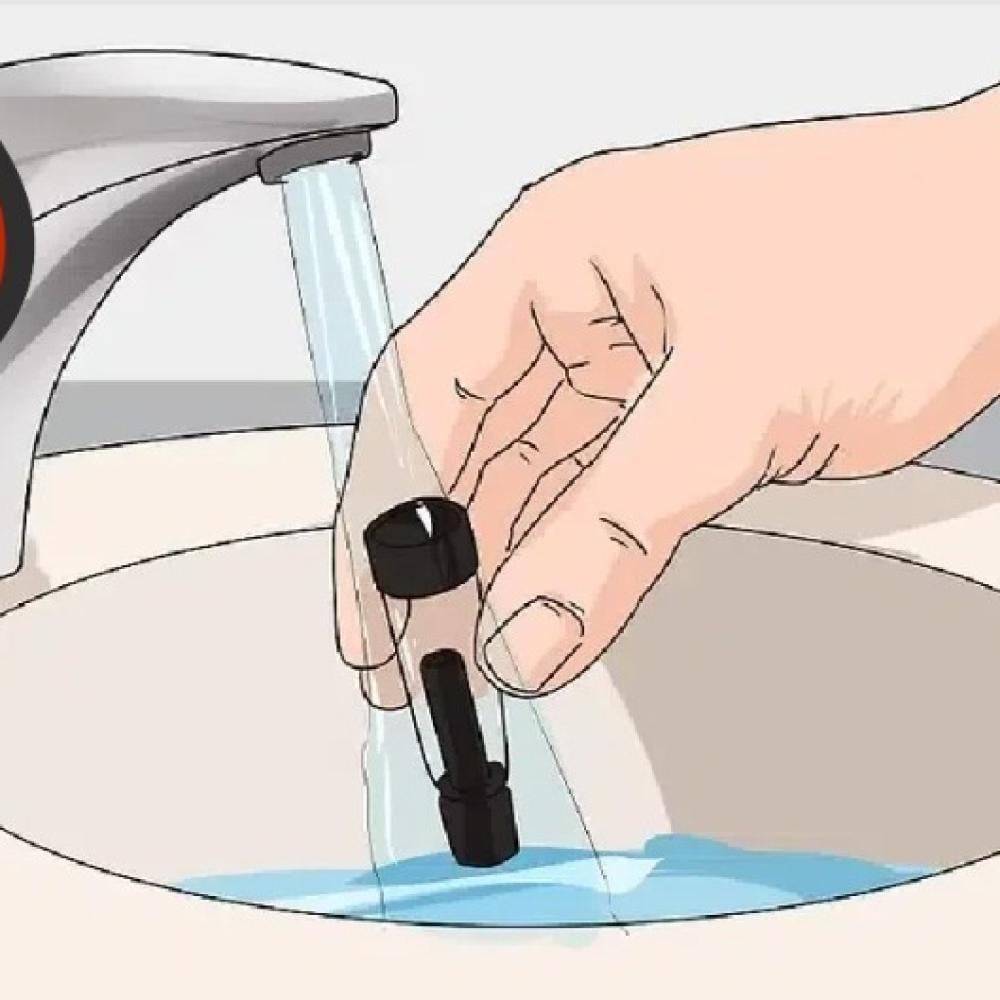
Rinse Regularly
Regular rinsing is a simple yet effective way to prevent buildup. You’d be surprised at how quickly residue can form, especially if you frequently switch flavors. It’s recommended to rinse your tank every week, or whenever you change e-liquids.
Just follow these steps:
- Use warm water to rinse all parts.
- For stubborn residues, a mixture of warm water and vinegar can do wonders.
- Be sure to rinse thoroughly to eliminate any leftover vinegar smell.
Dry Completely
After rinsing, drying your vape tank thoroughly is equally important. Any moisture left can mix with e-liquid and affect taste.
- Lay the components on a clean microfiber cloth.
- Allow everything to air dry completely for at least an hour.
- Inspect for any remaining water before reassembling.
Keeping your vape tank clean isn’t just about aesthetics; it’s crucial for flavor retention and longevity. With these simple steps, you can enjoy a consistently flavorful vaping experience!
Vape Maintenance 101: Cleaning Your Tank for Optimal Flavor
Continuing from the importance of keeping your vape tank clean, let’s delve into a step-by-step guide for making sure your tank is not just clean, but optimized for the best flavor.
Break It Down
The first step in optimal vape tank maintenance is to break it down, just like you did in the last section. Disassembling your tank carefully will make all the difference. Remember, take your time to ensure all components are detached properly.
- Start by removing the mouthpiece.
- Pay attention to removing the coil; gentle twisting can help prevent wear.
- Set aside each component systematically to avoid any mixing up.
Proper organization is key!
Rinse the Parts
Once disassembled, it’s time to rinse. Use warm water for this process, as it helps dissolve any stubborn residues.
- Hold each part under running water, ensuring that all nooks and crannies get a thorough rinse.
- You can also use a soft brush to clean those hard-to-reach areas, and it works wonders for the mouthpiece.
This simple rinse can effectively remove leftover e-liquid and residue, preparing your tank for the next step.
Soak for Deep Clean
For those who usually experience heavy buildup, a warm soak is the ideal solution.
- Fill a small bowl with warm water and add a splash of vinegar or baking soda.
- Let the parts soak for about 15-30 minutes.
This will break down the grime, giving your tank new life. Just remember not to soak rubber seals or cotton parts, as they can be damaged.
Air Dry
Finally, after rinsing and soaking, it’s crucial to let your vape tank air dry.
- Lay components flat on a microfiber cloth.
- Allow at least an hour—or longer if necessary—for them to dry completely.
This simple step can prevent moisture from impacting the flavor of your next vape session. Regular maintenance ensures each puff is fresh and flavorful, allowing your experience to remain enjoyable.
The Dos and Don'ts of Vape Tank Cleaning
Having explored the importance of maintaining your vape tank, it's now time to delve into the dos and don’ts of cleaning your vape tank. Avoiding common pitfalls will ensure you maintain the integrity of your vape without sacrificing flavor or functionality.
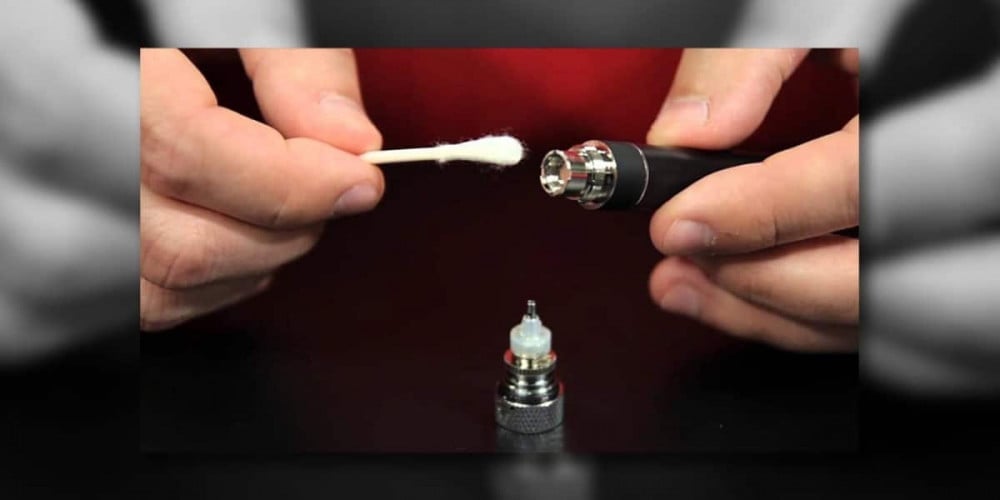
Do: Use Soft Brushes for Cleaning
One of the best practices for keeping your tank spotless is using soft brushes. A toothbrush or cotton swabs can be incredibly effective at reaching those challenging spots without scratching surfaces or causing damage.
Consider these tips:
- Focus on scrubbing around the mouthpiece, coil, and inside the tank.
- Use gentle strokes to avoid scraping or damaging any delicate components.
- Make it a habit to brush out your tank after every few refills to prevent buildup.
This method promotes not only cleanliness but also efficiency in your vaping experience.
Don't: Use Strong Detergents or Soap That Can Leave Residues
While it might be tempting to grab any household cleaner for a deep clean, strong detergents or soaps should be avoided like the plague. These products can leave behind residues that alter the flavor of your e-liquid or lead to unwanted aftertastes.
A few alternatives to consider include:
- Warm water alone for everyday cleaning.
- A mixture of vinegar and water for a deeper clean when necessary.
- Avoid anything with strong scents or chemicals to keep your flavors intact.
Do: Check Seals and Coils for Wear
Before reassembling your cleaned vape tank, take the time to inspect seals and coils carefully. Worn or damaged components can lead to leaks and poor performance.
A quick checklist for this inspection includes:
- Look for cracks or tears in the seals and O-rings.
- Check your coil for any signs of wear, such as discoloration or fraying.
- Replace any damaged parts promptly to maintain optimal vaping performance.
These small but significant checks will save you from future headaches and ensure a consistently enjoyable vaping experience. By following these dos and don'ts, you're well on your way to becoming a vape cleaning expert!
Complete Guide to Disassembling and Cleaning Your Vape Tank
Now that you’ve mastered the dos and don’ts of vape tank cleaning, it's time to get hands-on with a complete guide to disassembling and cleaning your vape tank. This process will ensure a spotless tank, ready to deliver those rich flavors you love!
Gather Tools
Before you dive into disassembly, make sure to gather all the required tools. Having everything ready will save you time and prevent any mishaps during the cleaning process. Here’s what you need:
- Soft brush: Great for scrubbing away residue.
- Microfiber cloth: Perfect for drying and polishing.
- Warm water: Essential for rinsing.
- Vinegar or baking soda: Good alternatives for deep cleaning.
- Tweezers: Helpful for removing small parts without damage.
With your toolkit assembled, you’re set for an efficient clean!
Remove the Tank
The first physical step involves carefully removing the tank from the vape device. Gently unscrew it from the battery section, ensuring not to apply excessive force. By doing so, you’ll avoid damaging the threads and seals that hold your tank in place.
- Start with the mouthpiece, twisting it off gently.
- After that, unscrew the tank from the battery.
- Make sure to keep track of all components, setting them aside in an organized manner.
It’s a straightforward process, but taking your time is key to avoiding any mistakes.
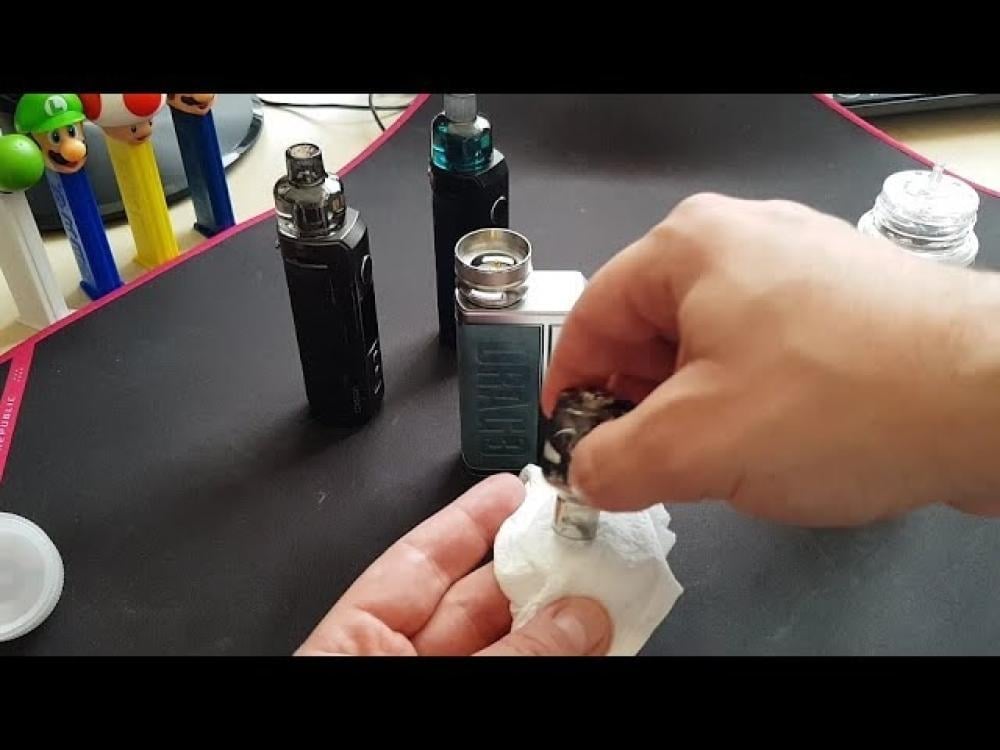
Scrub and Rinse
With the tank disassembled, it’s time to scrub and rinse each part. Utilizing your soft brush, you can effectively clean the components without scratching surfaces.
- Brush each area gently, ensuring you reach inside the tank and around the mouthpiece.
- Once scrubbed, rinse everything under warm running water to wash away any residue.
- For stubborn areas, soak the parts in warm water mixed with vinegar for about 15 minutes.
This combination of scrubbing and rinsing will prepare your tank for the final stage of drying. Taking these steps seriously will contribute significantly to the overall longevity and performance of your vaping experience!
Why Regular Cleaning of Your Vape Tank Matters
After mastering the ins and outs of cleaning your vape tank, you might still wonder why such regular maintenance is necessary. Understanding the importance of a clean tank goes beyond aesthetics; it directly impacts your overall vaping experience.
Preserve Flavor Quality
One of the most significant benefits of regular cleaning is the preservation of flavor quality. When you frequently switch e-liquids, lingering residues can affect the taste of your new vape.
Imagine switching from a fruity flavor to a rich dessert flavor—without cleaning, the residual fruity notes can distort the taste of your new liquid, resulting in a less than enjoyable experience.
To maintain that vibrant flavor profile, aim for:
- A quick rinse after each e-liquid swap.
- A thorough clean at least once a week.
Prolong Device Lifespan
Cleaning your vape tank regularly can also contribute to the longevity of your device. Buildup of gunk can lead to malfunctions such as leaking tanks or burnt coils, which not only affects performance but also requires more frequent replacements.
Keep an eye on:
- Signs of wear on seals and o-rings.
- The condition of your coils after regular cleaning sessions.
Avoid Health Risks
Lastly, maintaining cleanliness in your vape tank is essential for your health. Old e-liquids and residue can harbor bacteria or mold, posing potential health risks when inhaled.
A simple cleaning routine can vastly improve:
- Hygiene standards of your devices.
- Overall safety in your vaping practice.
In short, making time for regular cleaning is an investment in both your health and the quality of your vaping experience. With the flavors preserved and your device well-maintained, you’ll be ready to enjoy the full benefits of vaping!
How Often Should You Clean Your Vape Tank?
Now that we’ve established the importance of keeping your vape tank clean, it begs the question: how often should you be cleaning it? The frequency can vary based on your personal usage habits, but establishing a routine is key.
Daily Rinse for Heavy Users
If you find yourself vaping multiple times a day or frequently switching between different e-liquids, a daily rinse is highly recommended. Just think about it: after several sessions, the buildup can become significant, which can drastically affect flavor.
Here’s a simple approach for daily maintenance:
- A quick rinse of all components under warm water after every few refills.
- Using a soft brush for the mouthpiece and inside the tank will keep things fresh.
This quick, daily ritual can enhance your experience dramatically without taking much time.
Weekly Deep Clean
For moderate users who enjoy a consistent flavor profile and don’t switch e-liquids as frequently, a thorough cleaning once a week should suffice. This includes disassembling the tank, scrubbing, and rinsing all parts carefully.
Consider these steps for a weekly routine:
- Set a specific day to tackle your cleaning—maybe Sunday when you’re winding down.
- Incorporate soaking stubborn parts in vinegar or warm water to keep your tank in top shape.
This will not only maintain the integrity of your flavors but will also ensure that your tank remains in excellent working condition.
Change Coils Regularly
Don’t forget to check your coils! Depending on how often you vape, coils should be replaced every 1 to 3 weeks. Keeping an eye on this will significantly enhance the quality of each puff.
By establishing these cleaning frequencies, you’ll ensure a consistently enjoyable vaping experience, free of unwanted flavors or health risks. Your vape deserves a little TLC!
Tools You Need for a Thorough Vape Tank Cleaning
As you embark on the journey of keeping your vape tank clean, having the right tools at your disposal can make all the difference. Having a well-equipped cleaning kit not only simplifies the process but also ensures the efficiency and effectiveness of your cleaning routine. Here are the essential tools you need.
Soft Brush
A soft brush is perhaps the most important tool in your cleaning arsenal. Whether it's a dedicated vape cleaning brush or an old, clean toothbrush, this small investment goes a long way.
Why is a soft brush so effective?
- It can reach those tough spots inside the tank and mouthpiece without scratching surfaces.
- The bristles help dislodge stubborn residues that can build up over time.
You’ll be surprised at how easily a soft brush can take your cleaning routine to the next level. Personally, I noticed an immediate improvement in flavor after starting to use a brush during my cleanings!
Microfiber Cloth
Next on your list should be a microfiber cloth. Unlike paper towels, a microfiber cloth won’t leave lint or scratch your tank's surfaces.
Here's what makes it vital:
- It’s excellent for drying components thoroughly to avoid moisture buildup.
- You can use it to polish the outside of your tank, keeping it looking sleek.
Having this cloth on hand ensures your vape tank looks as good as it performs!
Warm Water and Vinegar
Lastly, you can’t overlook the power of cleaning solutions. A mixture of warm water and vinegar is fantastic for a natural and effective cleaning solution.
Here’s how to use it:
- Combine equal parts of warm water and vinegar.
- Soak your components for about 15-30 minutes to break down stubborn grime.
This homemade mixture is effective while being gentle on your tank’s materials.
Equipped with these tools, you’ll master the art of cleaning your vape tank in no time. Regular maintenance with the right supplies will keep your vaping experience enjoyable and flavorful!
Avoiding Common Mistakes When Cleaning Your Vape Tank
Cleaning your vape tank may appear simple, but it can be easy to fall into a few common traps that may harm your device or detract from your vaping experience. Awareness of these pitfalls can make your cleaning sessions much more effective and enjoyable.
Overlooking Proper Disassembly
One of the most frequent mistakes is failing to properly disassemble the tank before cleaning. Rushing through assembly can lead to damaged seals and o-rings, which might cause leaks later on.
To avoid this:
- Always refer to your vape’s manual for the correct disassembly procedure.
- Keep track of parts as you remove them to stay organized.
Taking your time during disassembly pays off!
Using Harsh Chemicals
Another common error is the use of strong detergents or soaps. Many new vapers might think that stronger cleaners will yield better results. However, this can leave behind residues that affect flavor.
Here’s how to clean effectively:
- Stick with warm water, vinegar, or baking soda for a more effective and safer clean.
- Always perform a thorough rinse to eliminate any potential residues.
An all-natural solution worked wonders for me when I made a switch from traditional soap!
Neglecting Regular Maintenance
Lastly, many vapers overlook the importance of regular cleaning. Letting residues build up can lead to more significant issues down the line, like uneven heating or burnt coils.
To stay ahead:
- Set reminders on your phone to prompt cleanings.
- Make it a part of your weekly routine, especially if you’re a frequent vaper.
By avoiding these common mistakes, your cleaning sessions will be more productive, ensuring that each puff you take is flavorful and satisfying. Stay committed to these best practices, and you’ll elevate your vaping experience!
Revive Your Vape: Expert Tips for a Sparkling Clean Tank
After exploring what to avoid when cleaning your vape tank, let’s switch gears and focus on some expert tips to give your tank a comprehensive refresh. With the right approach, you can turn a dull tank back into a sparkling gem!
Deep Clean with Dedicated Solutions
One of the best ways to revive your vape tank is to invest in dedicated cleaning solutions. These products are specifically formulated to break down e-liquid residue and other buildup, ensuring a thorough cleanse without harmful residues.
- Look for eco-friendly cleaners designed for vapes—many are non-toxic and safe for your device.
- Follow the manufacturer's instructions for how long to soak parts, as some cleaners might differ in their effectiveness.
Using such products has transformed my cleaning routine, and I’ve noticed a significant difference in flavor!
Utilize the Power of Soaking
Soaking your tank components is an incredibly effective way to deep clean. Instead of just a quick rinse, give your pieces a little break in a warm solution.
For best results:
- Use a mixture of warm water and vinegar or a specialized cleaning solution.
- Let the parts soak for 15-30 minutes before scrubbing; this loosens any stubborn debris.
This method works wonders—my tanks have never sparkled more after implementing this tip!
Incorporate Ultraviolet (UV) Light Cleaning
For those looking to take their cleaning routine to the next level, consider using a UV light cleaning method. This technology can effectively sanitize and kill bacteria that might lurk in your vape tank.
- Make sure your materials are compatible with UV exposure.
- Follow the instructions carefully to avoid any damage.
By incorporating these expert tips into your cleaning routine, your vape tank will not only be sparkling clean but will also enhance your overall vaping experience. Reviving your vape is just a clean away!
How Often Should You Clean Your Vape Tank
How Often Should You Clean Your Vape Tank?
Maintaining a clean vape tank is essential for ensuring optimal performance, preserving the flavor of your e-liquids, and prolonging the lifespan of your vaping device. Regular cleaning helps prevent residue buildup, clogged coils, and unpleasant tastes that can detract from your vaping experience. But how often should you clean your vape tank? The answer depends on several factors, including usage frequency, the type of e-liquids you use, and your personal vaping habits. Below is a comprehensive guide to help you determine the optimal cleaning schedule for your vape tank.
1. General Recommendations
- Regular Users (Daily Use):
- Frequency: Clean your vape tank once a week.
- Reason: Daily use leads to quicker buildup of residue and potential coil gunk, which can affect flavor and vapor production.
- Moderate Users (Several Times a Week):
- Frequency: Clean your vape tank every two weeks.
- Reason: Moderate usage still results in noticeable residue over time, necessitating regular maintenance to maintain quality.
- Occasional Users (Once a Week or Less):
- Frequency: Clean your vape tank once a month.
- Reason: Less frequent use means slower accumulation of residue, allowing for extended periods between cleanings without compromising performance.
2. Factors Influencing Cleaning Frequency
- Type of E-Liquid:
- High VG (Vegetable Glycerin) Liquids: Tend to produce thicker vapor and leave more residue, requiring more frequent cleaning.
- High PG (Propylene Glycol) Liquids: Generally leave less residue, allowing for longer intervals between cleanings.
- Sweet or Dessert Flavors: These can attract more residue buildup, necessitating regular cleaning to prevent stickiness and gunk.
- Device Type:
- Sub-Ohm Tanks: These generate more vapor and heat, leading to faster coil degradation and residue accumulation.
- Standard Tanks: May require less frequent cleaning compared to sub-ohm setups.
- Nicotine Strength:
- Higher Nicotine Levels: Can lead to quicker residue buildup, especially if using higher PG liquids.
- Lower or No Nicotine: Typically result in less residue, allowing for extended periods between cleanings.
- Vaping Habits:
- Cloud Chasing: Produces more vapor and can lead to faster coil clogging.
- Mouth-to-Lung (MTL) Vaping: Generally results in less residue buildup, reducing the frequency of required cleanings.
3. Signs It’s Time to Clean Your Vape Tank
Even if you follow a regular cleaning schedule, certain indicators can signal that your vape tank needs attention sooner:
- Change in Flavor: A noticeable decline in flavor intensity or the presence of burnt tastes indicates residue buildup.
- Reduced Vapor Production: Decreased vapor output can result from clogged coils or restricted airflow.
- Leaking or Gurgling Sounds: These noises can signify that the tank is dirty or that there's excess residue affecting airflow.
- Visual Residue: Visible gunk or buildup inside the tank requires immediate cleaning to prevent further issues.
4. Steps to Clean Your Vape Tank
Cleaning your vape tank is a straightforward process that can be done with minimal tools. Here's a step-by-step guide:
- Disassemble the Tank:
- Carefully remove the tank from your device.
- Take apart all removable components, including the mouthpiece, base, and coils.
- Empty Residual E-Liquid:
- Dispose of any remaining e-liquid responsibly.
- Avoid spilling by doing this over a sink or a disposable surface.
- Rinse with Warm Water:
- Rinse all parts (excluding the coil) under warm running water to remove loose residue.
- Ensure all components are thoroughly rinsed to prevent dilution of flavors.
- Soak the Tank:
- Fill a container with warm (not hot) water and add a few drops of mild dish soap.
- Soak the tank parts for 15-20 minutes to loosen stubborn residue.
- Scrub Gently:
- Use a soft brush or cotton swab to gently scrub the inside of the tank and the threads.
- Pay special attention to areas where residue tends to accumulate.
- Rinse Thoroughly:
- Rinse all parts multiple times with clean water to remove any soap residue.
- Ensure that no traces of soap remain, as they can affect flavor and safety.
- Dry Completely:
- Use a clean, lint-free cloth or paper towel to dry all components.
- Allow the tank to air dry completely before reassembling to prevent moisture buildup.
- Reassemble and Prime the Coils:
- Reassemble the tank, ensuring all parts fit securely.
- Prime the coils by applying a few drops of fresh e-liquid directly onto the cotton wick before filling the tank.
- Refill with E-Liquid:
- Fill the tank with your preferred e-liquid, avoiding overfilling to prevent leaks.
5. Additional Tips for Maintaining a Clean Vape Tank
- Use High-Quality E-Liquids: Premium e-liquids with fewer impurities reduce residue buildup.
- Avoid Prolonged Dry Hits: Regularly replenish e-liquid to prevent the coil from burning, which can leave behind stubborn residue.
- Store Properly: Keep your vape device in a clean, dry place to minimize exposure to dust and debris.
- Replace Coils Regularly: Even with diligent cleaning, coils degrade over time. Replace them as recommended by the manufacturer or when you notice a decline in performance.
- Monitor E-Liquid Levels: Keep an eye on your tank's e-liquid levels to ensure the coil remains saturated, preventing dry hits and excessive residue buildup.
Conclusion
Regularly cleaning your vape tank is crucial for maintaining the quality of your vaping experience. By adhering to a consistent cleaning schedule tailored to your usage patterns and being attentive to the signs that indicate your tank needs cleaning, you can enjoy better flavors, smoother vapor production, and a longer-lasting device. Incorporate these cleaning practices into your routine to ensure that your vape tank remains in optimal condition.
Disclaimer: Vaping carries health risks, including potential addiction and exposure to harmful substances. This guide is for informational purposes only and does not endorse or promote vaping. If you have health concerns or questions about vaping, consult a healthcare professional.
OXVA is a leading brand in the field of manufacturing vape products.
Elf Bar is a leading e-cigarette brand, known for offering ready-to-use vape devices.
Geek Vape is one of the leading companies in the vape devices and related accessories industry.
DZRT Nicotine Pouches is one of the brands specialized in nicotine pouches.
Ripe Vapes is a well-known company in the manufacture of electronic cigarettes and e-liquids (flavors).
Roll Upz is a well-known brand in the e-liquid industry.
Grand Vape (or Grand) is one of the companies specialized in manufacturing vape devices and electronic liquids.
Browse by most popular vape brands
Gummy is a specialty brand.
SMOK is one of the most popular brands.
Sams Vape is a well known brand.
DR.VAPES Dr.Vapes is one of the well-known companies
JUCY JUCY Flavors are a range of flavors used in electronic vaping.
Browse by most popular vape brands
Products of the brand Mood Vape Company
Disposable disposable syringes
Electronic vape and hookah devices
Salt and vape flavors for molasses and electronic hookah
Accessories, coils, supplies and pods for electronic devices