


**Welcome to Your Ultimate Resource for Changing Your Smok Vape Tank**
Are you looking for a reliable, step-by-step guide on how to change your Smok vape tank? You've come to the right place! Our comprehensive guide provides simple instructions for beginners and seasoned vapers alike. Learn how to properly change your Smok vape tank without any mess, ensuring you maintain the best flavor experience.
**Quick Tips for Effortlessly Replacing Your Smok Vape Tank**
Changing your Smok vape tank doesn’t have to be a daunting task. With our quick tips, you can effortlessly replace your tank and keep your vape fresh. We'll walk you through essential tools and techniques to ensure you get the job done right.
**The Ultimate Guide to Changing Your Smok Vape Tank: What You Need to Know**
In our ultimate guide, explore everything you need to know about Smok vape tank replacement. From identifying when your tank needs changing to understanding the nuances of each model, we cover it all.
**Troubleshooting: Why Your Smok Vape Tank Needs Changing and How to Do It**
Have you noticed a drop in flavor or performance? It might be time for a tank change. We’ll help you troubleshoot common issues, guiding you on why your Smok vape tank needs changing and how to perform the task effectively.
**Upgrading Your Experience: Changing Your Smok Vape Tank Like a Pro**
Ready to take your vaping experience to the next level? Our content will help you change your Smok vape tank like a pro, ensuring you enjoy the best flavors and perfect cloud production.
**Maintaining Flavor: When and How to Change Your Smok Vape Tank**
Understanding when and how to change your vape tank is crucial for maintaining flavor integrity. Our guide will provide insight into timing and techniques for the best possible vaping experience.
Explore our complete range of articles, from beginner-friendly tips to professional techniques, all aimed at helping you maximize your Smok vape experience. Get started today and ensure your vape stays fresh and flavorful!

Quick Tips for Effortlessly Replacing Your Smok Vape Tank
When it's time to change your Smok vape tank, having a few handy tips can make the process not only smoother but also more enjoyable. Here are some key points to consider before diving into the tank replacement process.
Gather Your Tools
Before starting, ensure you have everything you need at arm's length. A well-prepared workspace can reduce stress and mess. Here’s a checklist of essential tools:
- New Smok vape tank: Choose one that meets your preference and fits your device.
- E-liquid: Make sure you have your favorite flavor ready to go.
- Cotton swabs: For a quick clean-up.
- Drip tray or towel: To catch any spills.
Having these supplies organized will create a seamless transition when replacing your tank.
Stay Clean
Vaping is all about the experience, so maintaining cleanliness is essential. It’s easy to get juice on your hands or around your workspace. Here are some tips:
- Wipe down the area where you’ll be working to prevent sticky surfaces.
- Use a paper towel or microfiber cloth to handle the parts directly, avoiding grease or residue from your fingers.
A clean space ensures that your vaping experience remains enjoyable and hassle-free, free from unwanted distractions.
Prepare for Leakage
Even the best vape tanks can leak occasionally. To mitigate any mess:
- Position your tank at an angle so any remaining liquid can funnel out easily.
- Keep a few cotton swabs handy for quick clean-ups.
Being prepared for possible leakage can save you time and protect your surfaces while you focus on enjoying your new tank. By following these straightforward tips, anyone can make the process of replacing a Smok vape tank feel effortless and effective.
The Ultimate Guide to Changing Your Smok Vape Tank: What You Need to Know
Now that you have your workspace set up and your tools at the ready, it’s time to dive into the ins and outs of changing your Smok vape tank. This section will guide you through each step, ensuring you leave no stone unturned.
Unscrew the Old Tank
To kick things off, begin by gently unscrewing your old tank from the mod. This might require you to grip both components firmly. Make sure to turn counterclockwise, and if it feels stuck, a little twist back and forth can help loosen it.
- Tip: If you notice any resistance, check for any leftover e-liquid that may have congealed.
Empty the Tank
After you’ve successfully removed the tank, it’s time to empty it out. Hold the tank over your drip tray to catch any leftover e-liquid.
- What to do: Simply tip it upside down and let the remnants flow out.
- Clean Up: Use a paper towel to wipe any excess liquid that may have escaped.
Replace Cotton and Coil
With the tank emptied, it's a great idea to replace the cotton and coil. This step is crucial for maintaining flavor and performance.
- Remove the old coil: Simply pull it out from the base.
- Insert a new coil: Twist it in until secure.
- Change the cotton: If you’re using a rebuildable tank, replace your cotton with fresh strips.
Install the New Tank
Finally, it’s time to put on the new tank.
- Screw the new tank onto the mod: Ensure it’s tight but not over-torqued to avoid damage.
- Fill it with e-liquid: Follow your preferred filling method.
And voilà! You’re ready to enjoy your new e-liquid with a fresh tank. By following these straightforward steps, you'll find that changing your Smok vape tank becomes second nature. Happy vaping!
Smok Vape Tank Replacement: Simple Instructions for Beginners

Now that you’ve successfully installed your new tank, it’s essential to get everything set up for an optimal vaping experience. The following steps are simple and straightforward, making them perfect for beginners.
Remove the Cap
The first task is to remove the cap from your new tank. This might seem easy, but a few tips can help ensure it's done correctly.
- Twist Off: Most Smok tanks have a simple twist-off cap. Grip the tank firmly and twist counterclockwise to remove the cap.
- Check for Child Safety Features: Some models may have a child-proof lock. If you struggle to open it, look for any small buttons or tabs that need to be pressed.
Once the cap is off, you’re one step closer to refilling!
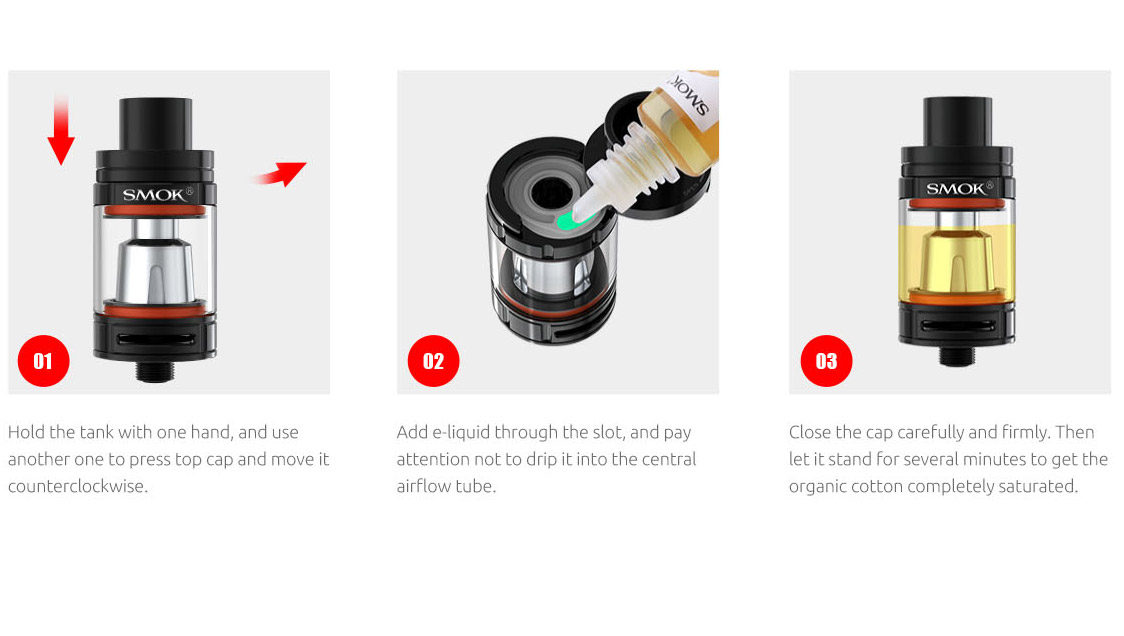
Fill with E-Liquid
Next, it's time to fill your tank with e-liquid. This step is crucial for a great vaping experience.
- Choose Your E-Liquid: Whether it’s your go-to flavor or something adventurous, have it ready.
- Fill Method: Locate the filling holes (usually on the side or top of the tank). Pour the e-liquid slowly to avoid spills. If your tank has multiple holes, fill one at a time.
Tip: Leave a small air bubble at the top to avoid the e-liquid overflowing.
Reassemble and Prime
With your tank filled, it’s time to put everything back together.
- Replace the Cap: Simply twist it back on, ensuring it’s secure.
- Prime the Coil: Let the tank sit for a few minutes to allow the coil to soak in the e-liquid. This helps prevent dry hits.
By following these easy steps, you can quickly learn how to replace your Smok vape tank and prepare it for enjoyment. Soon, you’ll be puffing away on a refreshing flavor, feeling like a pro in no time!
How to Properly Change Your Smok Vape Tank Without Mess
Changing your Smok vape tank doesn’t have to end with a sticky countertop or stained hands. With a few simple techniques, you can complete the process smoothly and without a mess. Here’s how to do it effectively.
Choose a Drip Tray
First and foremost, having a drip tray is a game-changer. It serves as the first line of defense against any spills or drips that may occur while you're swapping out tanks.
- What to Use: You don’t need fancy equipment; a shallow plastic tray, a paper plate, or even a towel can work wonders.
- Placement: Position your drip tray directly under your workspace where you'll be working with the tank. This ensures that any e-liquid that drips out will be contained, allowing for an easy clean-up.
Having a tray handy can lessen any potential frustration—believe me, every drop counts when you’re trying to keep things tidy!
Tilt the Tank
Next, when you're ready to remove the tank, a simple trick is to tilt it during the process.
- Why Tilt?: Tiling the tank helps to collect any residual e-liquid towards one end, allowing it to drain properly into your drip tray rather than splattering everywhere.
- How to Do It: As you unscrew the tank, angle it at about a 45-degree angle toward the drip tray. This positions the remains of any leftover liquid to flow out with gravity on your side.
By adopting these practices, you’ll find that changing your Smok vape tank is not only easy but also mess-free. A little preparation can go a long way in maintaining a clean and enjoyable vaping experience, leaving you to enjoy your flavors without distraction!
Keep Your Vape Fresh: A Complete Guide to Changing Your Smok Tank
As we transition into understanding how to keep your vape experience at its peak, maintaining your Smok tank is essential. Regularly changing your tank can dramatically improve flavor and performance while ensuring your vape remains fresh and satisfying. Here's a complete guide to help you through the process.
Understand When to Change
One of the keys to keeping your vape fresh is knowing when to make that change. Here are some signs that it may be time to replace your tank:
- Diminished Flavor: If your e-liquid tastes off or burnt, it’s a clear indicator that it’s time for a change.
- Color Changes: Watch out for dark colors in your e-liquid; this often signifies that it's been heated too many times.
- Physical Signs: Look for leaks, cracks, or any damage to the tank itself.
Keeping an eye on these signs can help you maintain a flavorful and enjoyable vaping experience.
Routine Maintenance
In addition to changing your tank, regular maintenance can go a long way in extending its life:
- Rinse the Tank: After emptying your tank, rinse it with warm water to remove residual e-liquid. This helps in preserving flavor.
- Replace Coils Regularly: Coils can wear out quickly, so replace them every week or two depending on usage. Fresh coils mean better flavor!
Consider putting reminders in your calendar for routine checks. By doing this, you’ll ensure that each session is as refreshing as the last!By following these straightforward guidelines, you’ll keep your Smok tank fresh and your vaping experience enjoyable. Remember, a little upkeep can make a world of difference in the quality of your vape!
Troubleshooting: Why Your Smok Vape Tank Needs Changing and How to Do It
Having a solid understanding of when to change your Smok vape tank is essential for a satisfying vaping experience. Whether you're a beginner or a seasoned vaper, knowing the signs and timing can save you from unpleasant surprises. Let’s dive into the common indicators that your tank needs attention and the best times to change it.
Signs You Need a Change
Recognizing when your Smok vape tank is due for a replacement can greatly enhance your vaping experience. Here are a few telltale signs:
- Burnt Taste: If each puff tastes burnt, it’s a surefire sign that your coil is worn out and a change is needed.
- Reduced Vapor Production: Noticeably thinner vapor can indicate that the coil isn’t functioning correctly.
- E-Liquid Leaks: Finding your tank leaking is not only frustrating but also a clear indication that it’s time to swap it out.
- Inconsistent Flavor: If the flavor of your e-liquid seems off or inconsistent, it’s likely time to replace the tank.
Being observant of these signs can help you avoid poor vaping experiences down the line.
When to Change
Timing is just as crucial as recognizing the signs. Consider changing your tank:
- After Every 2-3 Weeks: Regularly changing your tank every couple of weeks helps maintain flavor consistency and performance.
- After Every Bottle of E-Liquid: If you finish a bottle of e-liquid, it's often a signal to check your tank for necessary maintenance.
- When Switching Flavors: Changing flavors? It's best to swap tanks as well, as old flavors can linger and affect your new e-liquid.
By keeping these troubleshooting tips in mind, you can effortlessly maintain your Smok vape tank. This approach not only improves flavor but also enhances your overall vaping experience, ensuring every puff is enjoyable!
Upgrading Your Experience: Changing Your Smok Vape Tank Like a Pro
Now that you’ve mastered the essential steps in changing your Smok vape tank, it's time to elevate your vaping experience further. With a few tips under your belt, you can truly customize your setup and enjoy every puff to the fullest. Let’s discuss how to experiment with different tanks and the importance of staying informed.
Experiment with Different Tanks
One of the joys of vaping is that there’s always something new to try, especially when it comes to tanks. Here are some ideas to consider:
- Explore Varietals: Different Smok tanks come with unique features like adjustable airflow and varying coil options. Trying out new tanks can lead to quite different vaping experiences.
- Read Reviews: Before purchasing a new tank, take a moment to check out user reviews and ratings. This way, you can find tanks that have positive feedback for flavor and performance.
- Visit Local Vape Shops: If you have a local shop, feel free to ask for recommendations. Often, shop owners have tried various tanks and can guide you toward something that fits your preferences.
Stay Informed
Keeping up with the vaping community can enhance your experience tremendously. Here's how to stay in the loop:
- Follow Blogs and Forums: Websites and communities dedicated to vaping share valuable tips, new product releases, and industry news.
- Join Social Media Groups: Many vapers share experiences and recommendations on platforms like Facebook and Reddit. Engaging in these groups can help you learn from others and share your own insights.
Taking the time to experiment with different tanks and remain informed will not only help you upgrade your vaping experience but also deepen your understanding of the hobby. As you continue this journey, you’ll find your perfect setup in no time! Happy vaping!
Essential Tools and Techniques for Changing Your Smok Vape Tank
As we seek to upgrade our vaping experience, having the right tools and techniques at your disposal for changing your Smok vape tank can make a world of difference. Simplifying the process will reduce mess and enhance your overall satisfaction. Here’s a breakdown of essential tools along with some handy techniques to ensure smooth tank replacements.
Essential Tools
Whether you’re a novice or a seasoned vaper, having the following tools available can make changing your tank a breeze:
- New Smok Vape Tank: Always have a compatible replacement tank that fits your device.
- E-Liquid: Your favorite juices should be readily available for hassle-free refills.
- Cotton Swabs: Perfect for quick clean-ups should any e-liquid find its way out during the process.
- Drip Tray or Towels: Prevent messy spills by using a dedicated tray or towel to catch any drips.
These basic tools equip you for a clean, efficient tank change.
Helpful Techniques
In addition to having the right gear, utilizing effective techniques can elevate your tank-changing game:
- Pre-Soak: Allow your coil to soak in the e-liquid for a few minutes before use. This practice ensures a smoother start and prevents dry hits.
- Routine Checks: Regularly inspect your tank for wear and tear, and replace coils as needed. It’s beneficial to create a check-up schedule in your calendar.
- Air Flow Adjustment: Prior to filling, make minor adjustments to your airflow settings based on your vaping preferences. This can enhance flavor and vapor production.
By incorporating these tools and techniques into your routine, you’ll boost your confidence in changing your Smok vape tank. With practice, it becomes second nature, ultimately leading to a more enjoyable and flavorful vape!
Maintaining Flavor: When and How to Change Your Smok Vape Tank
One of the most important aspects of enjoying your vaping experience is maintaining that fresh, delicious flavor. Changing your Smok vape tank at the right times and in the right ways is crucial to achieving that. Let’s delve into when to change your tank and how to do it effectively to keep your vape tasting great.
When to Change Your Smok Vape Tank
There are key indicators that signal it's time for a change, and recognizing these can help preserve your flavor profile:
- Flavor Decline: If you start to notice a burnt or off taste, it usually means your coil or wick has degraded. Time for a swap!
- Frequent Juice Changes: If you switch between flavors often, it’s best to change the tank or at least rinse it out to avoid flavor contamination.
- Physical Signs of Damage: Cracks or leaks in your tank can affect the quality of your vape. As a rule of thumb, if it looks damaged, swap it out.
Keeping a regular schedule—like changing the tank after every few refills or at least once a month—can help you stay on top of things.
How to Change Your Smok Vape Tank
Now that you know when to change, let’s talk about how to do it without losing flavor:
- Thoroughly Clean Your Tank: After emptying it, rinse it with warm water. This removes residue and keeps flavors pure.
- Replace Coils Carefully: Take your time to ensure you're using a fresh coil that is compatible with your tank. Soak it in e-liquid before installation to prime it.
- Reassemble and Fill: After cleaning and replacing, put everything back together and fill the tank slowly to avoid bubbles.
With these tips, you can maintain the great flavors you love while ensuring that your Smok vape tank remains in top condition. An enjoyable vape is just a swap away!
How to Change a SMOK Vape Tank: A Step-by-Step Guide
Changing the tank on your SMOK vape device is a straightforward process that can enhance your vaping experience by ensuring optimal flavor and vapor production. Whether you're a beginner or an experienced vaper, following the correct steps will help you maintain your device's performance and longevity. This guide provides a comprehensive, easy-to-follow approach to changing your SMOK vape tank safely and effectively.
Disclaimer: Vaping involves inhaling substances that may contain nicotine, which is addictive and can have adverse health effects. This guide is intended for informational purposes only and does not endorse or encourage vaping. If you are considering vaping as a means to quit smoking, consult with a healthcare professional.
1. Gather Necessary Supplies
Before you begin, ensure you have the following items:
- SMOK Vape Device: Ensure your device is compatible with the tank you intend to install.
- New SMOK Vape Tank: Purchase the appropriate tank model for your device.
- E-Liquid: Choose a high-quality e-liquid that suits your flavor and nicotine preferences.
- Tools (Optional): Some tanks may require a small screwdriver or wrench, depending on the model.
- Paper Towels or Tissues: For cleaning any spills during the process.
2. Prepare Your Device
A. Turn Off and Disconnect
- Power Off: Ensure your vape device is turned off to prevent accidental firing of the coil.
- Remove the Battery (If Applicable): For devices with removable batteries, take out the battery to ensure safety.
B. Detach the Tank
- Unscrew the Tank: Gently twist the tank counterclockwise to detach it from the battery or mod.
- Inspect for Residue: Check the threads and connections for any leftover e-liquid and wipe them clean with a paper towel.
3. Disassemble the Old Tank
A. Remove the Coil and Wick
- Unscrew the Coil: Depending on your tank model, unscrew the coil from the base of the tank.
- Discard the Old Coil: Coils are typically disposable and should be replaced regularly to maintain flavor and vapor quality.
- Clean the Tank: Rinse the tank with warm water to remove any remaining e-liquid, then dry it thoroughly with a paper towel.
B. Check O-Rings and Seals
- Inspect O-Rings: Ensure that the O-rings (small rubber rings) are intact and not damaged. Damaged O-rings can cause leaks.
- Replace If Necessary: If any O-rings are worn out or cracked, replace them before installing the new tank.
4. Install the New Tank
A. Assemble the Tank
- Insert the Coil: Screw the new coil into the base of the tank. Ensure it is tightly secured but avoid over-tightening, which can damage the threads.
- Fill the Tank with E-Liquid:
- Open the Fill Port: Depending on your tank model, open the top or side fill port.
- Fill Carefully: Use a dropper or syringe to fill the tank with your chosen e-liquid. Fill up to the recommended maximum fill line to prevent overfilling.
- Prime the Coil: Allow the e-liquid to saturate the wick by letting the tank sit for 5-10 minutes after filling.
B. Attach the Tank to the Device
- Align and Screw On: Gently screw the new tank onto your vape device clockwise until it is securely attached.
- Check for Leaks: Before powering on, inspect all connections to ensure there are no visible leaks.
5. Power On and Test
- Reconnect the Battery: If you removed the battery, reinsert it into your device.
- Turn On the Device: Press the power button according to your device's instructions (usually five rapid presses).
- Adjust Settings (If Applicable): For adjustable devices, set your desired wattage or temperature settings suitable for the new coil.
- Take a Test Puff: Inhale gently to ensure the device is producing vapor smoothly without any harsh hits or leaks.
6. Maintenance Tips to Prevent Leaks and Ensure Longevity
A. Regular Cleaning
- Clean the Tank Weekly: Rinse the tank with warm water and dry it to prevent residue buildup.
- Wipe Down Connections: Keep all connections clean and dry to maintain airtight seals.
B. Replace Coils as Needed
- Monitor Coil Lifespan: Replace coils every 1-2 weeks or when you notice a decline in flavor and vapor production.
- Avoid Reusing Old Coils: Reusing coils can lead to poor performance and potential leaks.
C. Proper Storage
- Store Upright: Keep your vape device and tank upright to prevent e-liquid from pooling in unwanted areas.
- Avoid Extreme Temperatures: Protect your device from excessive heat or cold, which can damage components and affect performance.
D. Use Compatible E-Liquids
- Choose Appropriate VG/PG Ratios: High Vegetable Glycerin (VG) e-liquids are thicker and may require devices designed to handle them to prevent leaks.
- Avoid Contaminants: Use clean, high-quality e-liquids to prevent clogging and damage to your device.
7. Troubleshooting Common Leakage Issues
A. Overfilling the Tank
- Solution: Always fill to the recommended maximum fill line and avoid overfilling. If overfilled, carefully drain the excess e-liquid.
B. Loose Connections
- Solution: Ensure that all parts are securely tightened. Reassemble the tank and device carefully to maintain airtight seals.
C. Damaged O-Rings
- Solution: Inspect and replace any damaged O-rings to restore proper sealing and prevent leaks.
D. High VG E-Liquids
- Solution: Use devices and tanks designed to handle high VG e-liquids or opt for a balanced VG/PG ratio to reduce viscosity and leakage risks.
8. When to Seek Professional Help
If you continue to experience leakage issues despite following the above steps, consider the following:
- Consult the Manufacturer: Reach out to SMOK customer support for device-specific advice.
- Visit a Vape Shop: Seek assistance from knowledgeable staff who can inspect your device and provide hands-on help.
- Check Warranty: If your device is still under warranty and experiencing persistent issues, consider repairing or replacing it through official channels.
Conclusion
Changing the tank on your SMOK vape device is a simple process that can significantly enhance your vaping experience when done correctly. By following this step-by-step guide, you can ensure that your device operates efficiently, delivers optimal flavor and vapor, and minimizes the risk of leaks. Regular maintenance, proper handling, and using high-quality components are key to maintaining the longevity and performance of your vape device. Always refer to your device's user manual for model-specific instructions and safety guidelines.
Additional Resources:
- SMOK Official Website: www.smoktech.com – Find official guides, support, and product information.
- Vape Community Forums: Join online forums and communities to share experiences and tips with other vapers.
- Local Vape Shops: Visit local vape stores for hands-on assistance and personalized recommendations.
Disclaimer: This guide is intended for individuals who are of legal age to use vaping products. Vaping may not be safe for everyone and is not recommended for non-smokers, pregnant women, or individuals with certain health conditions. Always consult with a healthcare professional before starting or changing your vaping habits.
OXVA is a leading brand in the field of manufacturing vape products.
Elf Bar is a leading e-cigarette brand, known for offering ready-to-use vape devices.
Geek Vape is one of the leading companies in the vape devices and related accessories industry.
DZRT Nicotine Pouches is one of the brands specialized in nicotine pouches.
Ripe Vapes is a well-known company in the manufacture of electronic cigarettes and e-liquids (flavors).
Roll Upz is a well-known brand in the e-liquid industry.
Grand Vape (or Grand) is one of the companies specialized in manufacturing vape devices and electronic liquids.
Browse by most popular vape brands
Gummy is a specialty brand.
SMOK is one of the most popular brands.
Sams Vape is a well known brand.
DR.VAPES Dr.Vapes is one of the well-known companies
JUCY JUCY Flavors are a range of flavors used in electronic vaping.
Browse by most popular vape brands
Products of the brand Mood Vape Company
Disposable disposable syringes
Electronic vape and hookah devices
Salt and vape flavors for molasses and electronic hookah
Accessories, coils, supplies and pods for electronic devices